Active Directory Domain Services Forest
Introduction
This report is a step-by-step tutorial which explains how to set-up and configure an Active Directory forest with multiple servers on one domain. This forest will simulate the forest for a fictional company called Big Potato Inc., which is spread across three physical locations: Calgary, Minnesota, and London. The forest will be initially set up in Calgary on a Windows Server 2012 R2 Standard Core, and the other locations will configure domain controllers that will join that existing domain.
We will be using a virtual environment running on VMware vSphere, a cloud computing virtualization platform. This virtual environment will simulate a network in three different locations. The steps in this report can be carried over to any physical networks which need to be connected to an Active Directory Domain.
Here is a breakdown of the devices that are on this network:
- 1 x Router running pfSense
- 3 x Windows Server 2012 R2 Standard Core
- 3 x Windows Server 2012 R2 Standard with GUI
- 3 x Windows 8.1 Clients
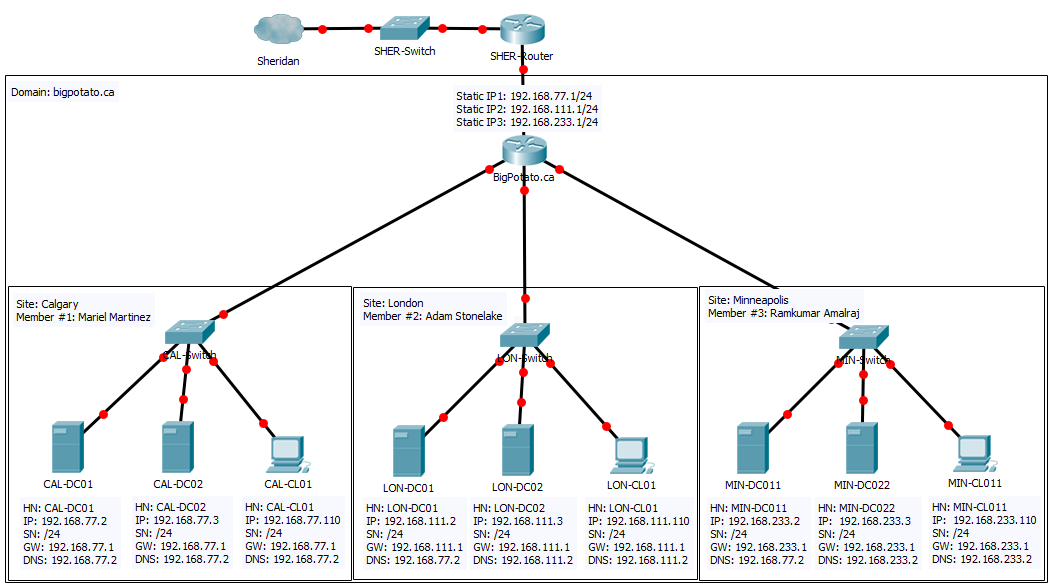
Network Diagram
The following diagram describes the proposed environment for Big Potato's network:
Forest Setup and Joining the Domain
This section will show the steps to implement the configuration, outlined in Part 1, for our new organization.
Setting Up the Root Domain
The very first step to setting up this forest is creating the root domain. This must be done before any steps, otherwise the other servers have no domain to join. In our example, the root domain is set up in the Calgary location by Member 1 with CAL-DC01.
Since the server CAL-DC01 is running Standard with core, we only have the command prompt and PowerShell commands at our disposal. Simply copy and paste the blue commands below in your PowerShell console (you can open a PowerShell console by running the command 'Start PowerShell' on the command prompt).
Set IP address:
New-NetIPAddress -IPAddress 192.168.77.2 -PrefixLength 24 -DefaultGateway 192.168.77.1 -InterfaceAlias Ethernet- Your Interface Alias may be different from this. Double-check the name of your Interface Alias with the command Get-NetIPConfiguration
Set time zone:
Tzutil.exe /s "Eastern Standard Time"Rename computer:
Rename-Computer -NewName CAL-DC01Restart computer to finalize renaming:
Restart-ComputerInstall Active Directory:
Install-WindowsFeature -Name AD-Domain-Services -IncludeManagementTools -IncludeAllSubFeaturePromote to Domain Controller:
Install-ADDSForest -DomainName "bigpotato.ca"- This will create a domain called bigpotato.ca, so replace this with your own domain name
- You will also be prompted for a SafeModeAdministratorPassword
After executing these commands, your domain is ready for other domain controllers to join!
Joining Server Core Servers to the Root Domain
The PowerShell commands to join other domain controllers to the root domain are actually very similar to the ones for initially setting up the root domain. In our example, these are the commands to set up MIN-DC011. The process is similar for CAL-DC02, LON-DC01, LON-DC02, and MIN-DC022. Refer to the network diagram to ensure all the commands get the correct parameter values. Any values that are underlined in these commands will be different for each server.
These are the PowerShell commands to join an existing domain:
Set IP address:
New-NetIPAddress -IPAddress 192.168.233.2 -PrefixLength 24 -DefaultGateway 192.168.233.1 -InterfaceAlias EthernetSet time zone:
Tzutil.exe /s "Eastern Standard Time"Rename computer:
Rename-Computer -NewName MIN-DC011Restart computer to finalize renaming:
Restart-ComputerInstall Active Directory:
Install-WindowsFeature -Name AD-Domain-Services -IncludeManagementTools -IncludeAllSubFeatureSet CAL-DC01 as DNS Server
Set-DnsClientServerAddress -InterfaceAlias Ethernet -ServerAddresses("192.168.77.2")- This is a VERY important step. Your other servers MUST point to the server that set up the root domain, otherwise your server will not be able to translate the domain name to the appropriate IP address
Promote to Domain Controller and join existing domain:
Install-ADDSDomainController -InstallDns -DomainName "bigpotato.ca" -Credential (Get-Credential "BIGPOTATO\Administrator")- You will be prompted to enter the credentials for CAL-DC01, NOT the administrator password for the computer you are physically using.
- You will also be prompted for a SafeModeAdministratorPassword
- Finally, you will also be warned that the server will be configured as a domain controller. Press Enter to accept the default

- Your server will need to restart before the promotion is complete
After executing these commands, your server will be joined to the root domain! Before starting Part 2, you should join all your servers to your root domain. The servers are: CAL-DC02, LON-DC01, LON-DC02, MIN-DC011, and MIN-DC022.
Joining a Client to the Domain
This section shows how to join a Client computer to the domain. The steps below are the settings for CAL-CL01, but can be used to configure any other client as long as the underlined values reflect those in the network diagram.
Configure DNS and IP address
- Right-Click on the Network icon in the system tray.
- Select "Open Network and Sharing Center"
- In the section "View your active Networks" select "Ethernet"
- In the window that opens, select "Properties"
- Scroll through the items in the list and double-click on "Internet Protocol Version 4 (TCP/IPv4)"
Enter the following information (remember to replace the underlined values with the network diagram information):
- IP address: 192.168.77.4
- Subnet mask: 255.255.255.0
- Default Gateway: 192.168.77.1
- DNS server: 192.168.77.2
Associate Client with Domain
Here are the steps to add your Windows client to the server's domain:
- Right-click on the Windows start charm (bottom-left hand of screen).
- Select "System"
- From the window that pops up, select "Change settings…"
- In the window that pops up, click the "Change…"
- Select "Domain:", and enter the name of your server's domain (bigpotato.ca).
- Click OK, and you will be prompted to enter administrator credentials to give your client permission to join the domain. Enter "administrator" for the user name, and the administrator password for your Windows Server (not your client).
- After following these steps, you will see an alert welcoming you to the bigpotato.ca domain and be prompted to restart the computer.
Once you restart, you will be part of the bigpotato.ca domain. In order to sign into the server's domain, you will need to select "Other user" when logging in on your Windows client. From there, you will be able to sign in as administrator to the bigpotato.ca domain.
Adding a Server to the Windows Client
Now that we can sign in as administrator to bigpotato.ca, we can access Server Manager from our Windows Client. But first, we need to add the server to our Server Manager. In this example below, I'm going to add CAL-DC01 to CAL-CL01. To start this process, first sign in as administrator@bigpotato.ca on the Windows Client, then follow these steps:
- You should see a folder called "Administrative Tools" on your Desktop. Open it.
- Open the "Server Manager" shortcut.
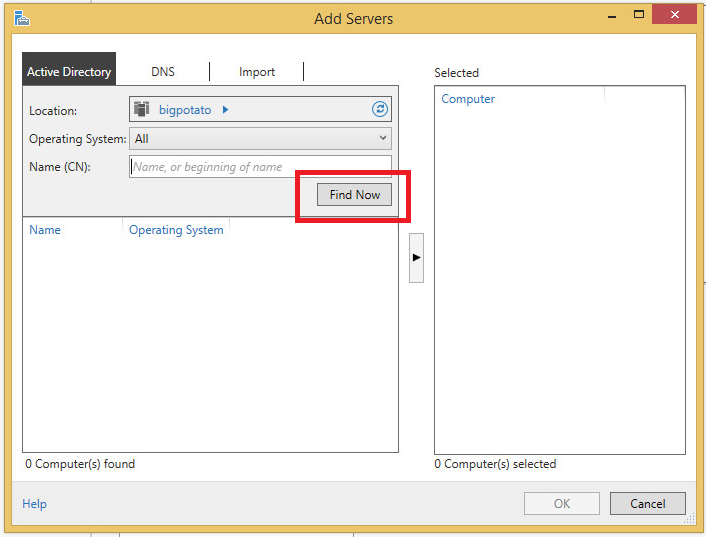
- You should now see the Server Manager dashboard. Right-click on "All Servers" on the sidebar and select "Add Servers"
In the window that appears, click "Find Now"
The list on the left should populate with all machines that have joined the bigpotato.ca domain. Like below:
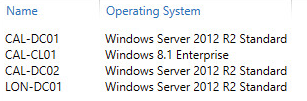
- Add the server you want to control from the client with the arrow in the middle (in this example, I will add CAL-DC01).
- Click OK.
If you give Server Manager a few moments to refresh, you should then see the server you added and its roles appear in Server Manager. Now, we have GUI functionality with our Server Cores!
Configuring Active Directory Sites and Services
In this section, we will configure Active Directory Sites and Services so that the servers in our domain appear in the correct sites. We will create three sites: Calgary, London, and Minnesota, subnets associated with each site, and inter-site transports which will make the link between London and Minnesota a backup link.
Please note that we created this section by following the steps in an IT Free Training video. In order to start working with the Sites and Services utility, open Server Manager, and from "Tools" select "Active Directory Sites and Services".
Create Sites
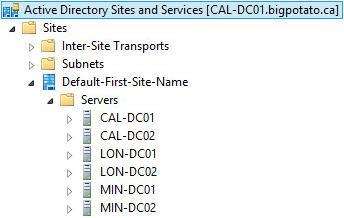
When you first open the Sites and Services utility, and open up the file tree on the left, you will see all the servers that you have added under "Default-First-Site-Name", like so:
The first thing we're going to do is rename that to reflect the first location, Calgary. You can do this by simply right-clicking on the site, and selecting "rename".
In order to create a new site, we're going to right-click on the "Sites" folder, and click "New Site…". In the window that pops up, enter the name you want for your site (in our case it's London). We're going to need to select a link next. For now, just select DEFAULTIPSITELINK.
Now, repeat this process to create a site for Minnesota.
After the sites are created, we need to move the servers to the correct locations. This is a simple matter of dragging and dropping the servers to other containers. Try dragging MIN-DC022 to the "Servers" folder in Minnesota. You will get a warning telling you that moving the server may affect group policies. The warning looks like this:
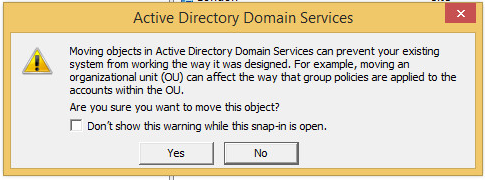
We have yet to create any group policies, so we can ignore this message for now (i.e. click "Yes").
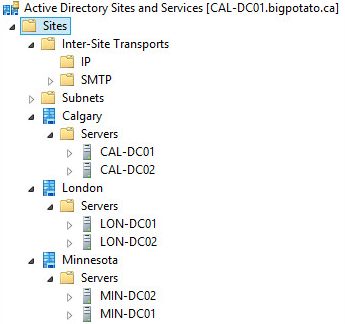
Make sure to move the other servers to the correct locations. Your file tree should look like this:
Create Subnets
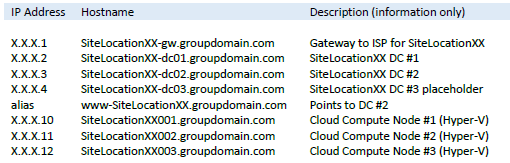
Next, we need to create subnets to associate with these sites. After following this process, if new servers are added to the domain, they will appear automatically in the correct site depending on their network ID. Recall that in our network diagram, our physical locations correspond with these network IDs:
- Calgary: 192.168.77.0/24
- London: 192.168.111.0/24
- Minnesota: 192.168.233.0/24
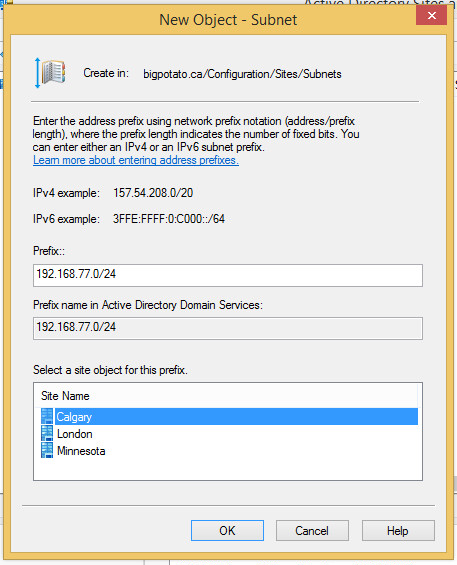
In order to create these subnets, you will need to right-click on the "Subnets" folder and select "New Subnet…". Enter the prefix using network prefix notation, as instructed. Then, select the appropriate site object for the prefix. In our case, 192.168.77.0/24 is used for Calgary. Your entries should appear similar to this:
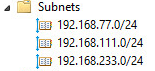
Click "Ok", and repeat the process for London and Minnesota. Your "Subnets" folder should look like this:
Create Inter-Site Transports
We're going to create site links between Calgary and London, Calgary and Minnesota, and London and Minnesota. For the purposes of this report, we're going to make the London-Minnesota link the "back-up" link, and make sure that Active Directory mainly replicates using the links to Calgary.
For this report, we are going to create IP Inter-Site Transports. So, go into the IP folder, and in the blank space, right-click and select "New Site Link…". Our links are only going to include two sites each. For this first example, add Calgary and London to the site link and click "OK".
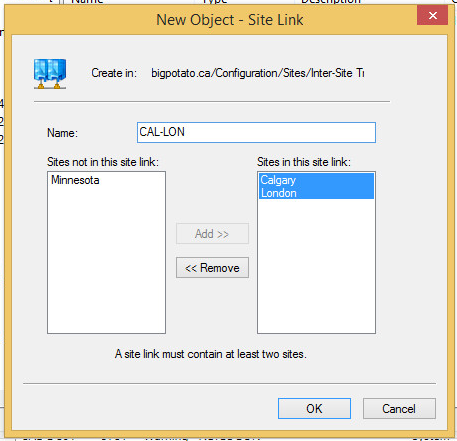
Repeat this process for Calgary and Minnesota, and London and Minnesota.
Now that our site links are created, you can safely delete "DEFAULTIPSITELINK".
In order to make the LON-MIN site link the back-up, we're going to reduce the cost. To do so, right-click on LON-MIN and select "Properties".
In the bottom section, you will see "Cost". By default, it is at 100. We're going to reduce that slightly, to 90.
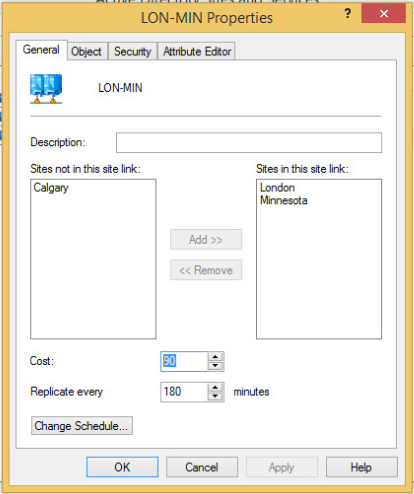
After making the change, make sure to click "OK". Now that the cost is lower, the servers will prefer to use the CAL-LON and CAL-MIN links for replication.
Configuring Servers
Now that all our servers and client machines have joined the bigpotato.ca domain, we can configure our servers using the RSAT tools on our clients; we just need to sign in as administrator@bigpotato.ca on our Windows Clients. In the following sections, we'll still make use of PowerShell commands, but some GUI steps will be mixed in as well.
Configuring DHCP on Server Cores
Each of our Server Cores are going to act as DHCP Servers. These are the PowerShell commands to install the DHCP server role, and configure DHCP. These are based on an article on FAQ Forge [1].
Note that the underlined values will change depending on the server being configured. Here are the pools that will be created:
- Calgary: 192.168.77.111 - 192.168.77.222
- London: 192.168.111.111 - 192.168.111.222
- Minnesota: 192.168.233.111 - 192.168.233.222
Install the DHCP server role
Install-WindowsFeature -Name 'DHCP' -IncludeManagementTools
Add DHCP Scope
Add-DhcpServerV4Scope -Name "CAL DHCP Scope" -StartRange 192.168.77.111 -EndRange 192.168.77.222 -SubnetMask 255.255.255.0Add DNS Server, Router Gateway, Options in DHCP
Set-DhcpServerV4OptionValue -DnsServer 192.168.77.2,142.55.100.25 -Router 192.168.77.1Get your scope ID
Get-DhcpServerV4Scope
Set Up Lease Duration
Set-DhcpServerV4Scope -ScopeID 192.168.77.2 -LeaseDuration 1:00:00:00Restart DHCP Service
Restart-Service dhcpserver
Next, we're moving into Server Manager to make sure that everything was configured correctly. With these PowerShell commands, there's still some Post-Install configuration that we must finalize. You'll see an alert in Server Manager telling you that. Click the alert, and a wizard will launch. Simply commit to the default, and press OK when everything is done.

Reservations with GUI
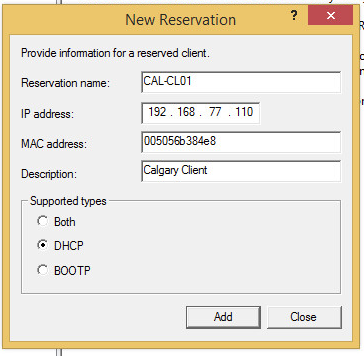
Next, we're going to create DHCP reservations. For our environment, we want all our Windows Clients to obtain the IP address X.X.X.110, depending on the location. For example, CAL-CL01 will always get 192.168.111.110.
To create the reservation from DHCP Manager (open it via Server Manager), we need to get the MAC address for our client. To do that, make sure the client is obtaining its IP address and DNS servers automatically (it will get it from the DHCP server we just configured). The client should then appear under Address Leases in DHCP Manager, like so:

One of the columns you'll see is "Unique ID". Write down that value.
Next, right-click on Reservations and select "New Reservation…". Fill in the information like so:
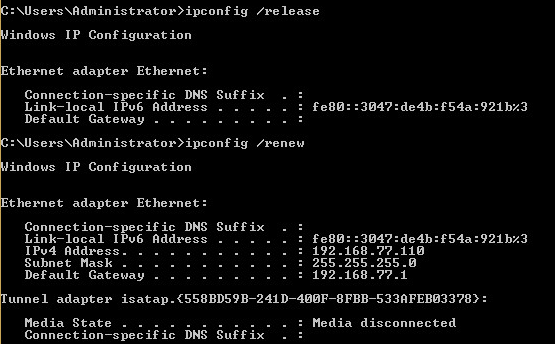
To ensure that everything worked correctly, open the command prompt on the windows client and enter the commands "ipconfig /release" and "ipconfig /renew". The output should show that your client got the appropriate IP address.
Reservations with PowerShell
Given the MAC address of a machine, you can create a DHCP reservation with this command:
Add-DhcpServerV4Reservation -Name "Robert Computer" -ClientId 005056833c49 -IPAddress 192.168.77.100 -ScopeId 192.168.77.0- The client ID is the machine's MAC
- The IP Address is what they will be given
- Recall that you can get Scope ID with
Get-DhcpServerV4Scope
Configuring Server GUIs to be Web Servers
Now, we're going to move on to our Servers with GUI (i.e. CAL-DC02, LON-DC02, MIN-DC022). This section will be carried out on CAL-DC02, but will be replicated on the other Server GUIs. We're going to install IIS on them and they will act as web servers that will display important Big Potato announcements. The steps to install IIS were taken from a Laser Fiche article [2].
To install IIS, go into Server Manager and select Manager > Add Roles and Features. When at the "Server Selection" page, select CAL-DC02 from the server pool. Keep the other options at their default and keep clicking "Next" until reaching Server Roles. Select the role "Web Server (IIS)" from the list:
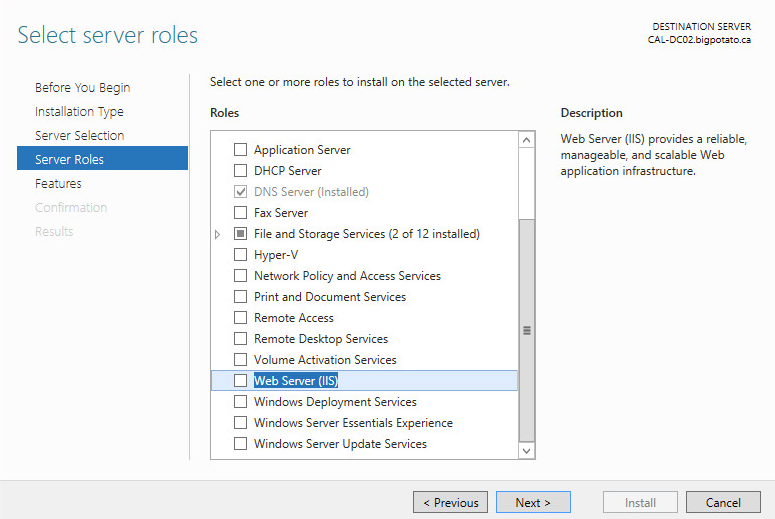
Add the features required and keep options at their default. Install when prompted.
Editing the Default Web Site
Open the IIS Manager by right-clicking on CAL-DC02 in Server Manager > IIS. When you open the file tree, you should see "Default Web Site" under sites. Right-click on it and select "Explore", like so:

You'll find yourself in a folder called "wwwroot" with two files in it. Right-click on iisstart and open with Notepad. You may write HTML in this file to test your ability to make changes.
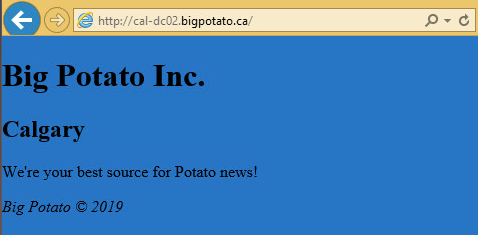
Visiting the Website
On a client computer, you'll be able to access the website via the URL CAL-DC01.bigpotato.ca for now. We will create a DNS alias to give that a more user friendly name later. Regardless, you should be able to see the lovely website we created.
Configure DNS
DNS is installed by default on all Active Directory Domain Controllers. We will now add records to it.
Reverse Zone
The PowerShell command to add a DNS Reverse Zone in our environment is as follows:
Add-DnsServerPrimaryZone -ReplicationScope "Forest" -NetworkId 192.168.77.0/24This command was found in a Read and Execute article [3].
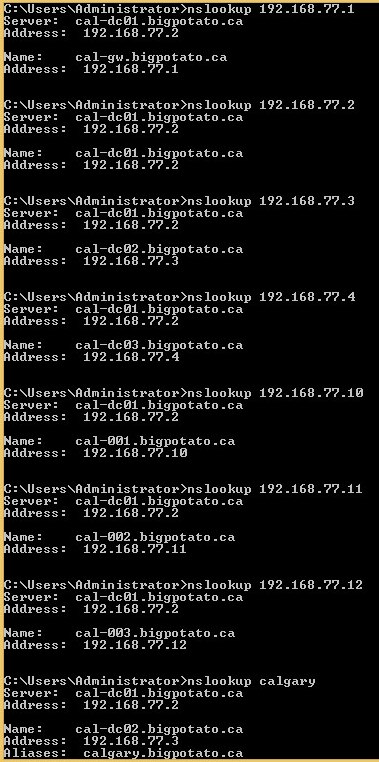
Creating DNS Records
For each server, we are going to need to create the following DNS records:
To create each of these A records for CAL-DC01, use the following commands:
Add-DnsServerResourceRecordA -IPv4Address "192.168.77.1" -Name "cal-gw" -ZoneName "bigpotato.ca" -AllowUpdateAny -TimeToLive 01:00:00 -CreatePtr
Add-DnsServerResourceRecordA -IPv4Address "192.168.77.2" -Name "cal-dc01" -ZoneName "bigpotato.ca" -AllowUpdateAny -TimeToLive 01:00:00 -CreatePtr
Add-DnsServerResourceRecordA -IPv4Address "192.168.77.3" -Name "cal-dc02" -ZoneName "bigpotato.ca" -AllowUpdateAny -TimeToLive 01:00:00 -CreatePtr
Add-DnsServerResourceRecordA -IPv4Address "192.168.77.4" -Name "cal-dc03" -ZoneName "bigpotato.ca" -AllowUpdateAny -TimeToLive 01:00:00 -CreatePtr
Add-DnsServerResourceRecordCName -Name "calgary" -HostNameAlias "cal-dc02.bigpotato.ca" -ZoneName "bigpotato.ca"
Testing with nslookup
The following screenshots show that the A Records and Reverse Records were created successfully:
Creating Administrator Users
We are now going to create 4 users, one for each of our group members listed in the proposal section, and for our instructor for this course. Each of these users will be full domain administrators. Here are the PowerShell commands to create our 4 users:
New-ADUser marmarie -UserPrincipalName "marmarie@bigpotato.ca" -GivenName Mariel -SurName Martinez -DisplayName "Mariel Martinez" -Path "DC=bigpotato,DC=ca" -AccountPassword (ConvertTo-SecureString -AsPlainText Secret123 -Force) -ChangePasswordAtLogon $true -Enabled $true
New-ADUser stonelak -UserPrincipalName "stonelak@bigpotato.ca" -GivenName Adam -SurName Stonelake -DisplayName "Adam Stonelake" -Path "DC=bigpotato,DC=ca" -AccountPassword (ConvertTo-SecureString -AsPlainText Secret123 -Force) -ChangePasswordAtLogon $true -Enabled $true
New-ADUser amalraj -UserPrincipalName "amalraj@bigpotato.ca" -GivenName Ramkumar -SurName Amalraj -DisplayName "Ramkumar Amalraj" -Path "DC=bigpotato,DC=ca" -AccountPassword (ConvertTo-SecureString -AsPlainText Secret123 -Force) -ChangePasswordAtLogon $true -Enabled $true
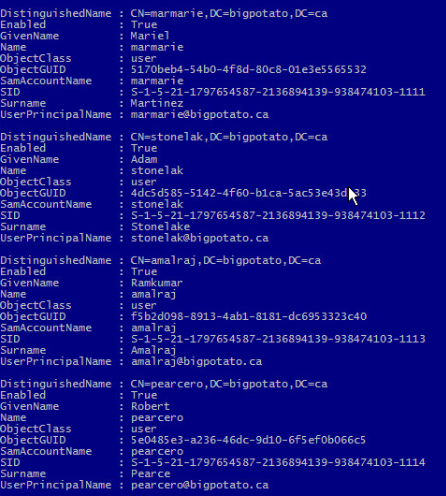
New-ADUser pearcero -UserPrincipalName "pearcero@bigpotato.ca" -GivenName Robert -SurName Pearce -DisplayName "Robert Pearce" -Path "DC=bigpotato,DC=ca" -AccountPassword (ConvertTo-SecureString -AsPlainText Secret123 -Force) -ChangePasswordAtLogon $true -Enabled $trueWe can confirm that our users were created by running the command Get-ADUser -Filter * and the output should include the users we created:
Now, in order to turn each of these users into a domain administrator, we will need to add them to the "Domain Admins" group. Here are the PowerShell commands to do that:
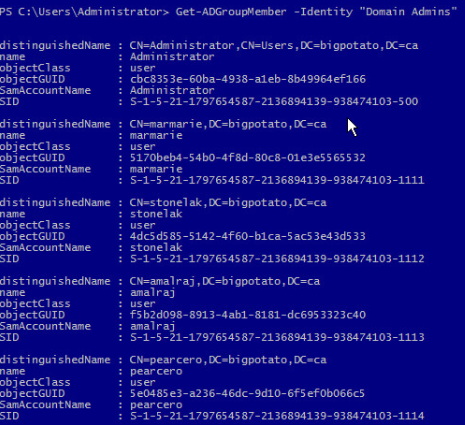
Add-AdGroupMember -Identity "Domain Admins" -Members pearcero,marmarie,stonelak,AmalrajWe can confirm that our users were added to the group by running Get-AdGroupMember -Identity "Domain Admins":
Creating a Security Group
In order to create a security group and add our users to it, execute these commands:
New-ADGroup -Name "TECHS" -GroupScope Global -GroupCategory Security -Path "DC=bigpotato,DC=ca"
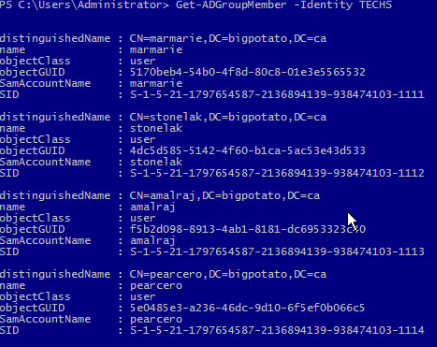
Add-ADGroupMember -Identity TECHS -Members pearcero,marmarie,stonelak,AmalrajYou can confirm that the users were added to this group with the command Get-ADGroupMember -Identity TECHS:
Creating a Share Folder on the Domain
We're going to need to create a shared folder that can be accessed throughout the domain. This will be created on CAL-DC02. We found the steps to create a shared folder in an iKnowledge article. These are those steps:
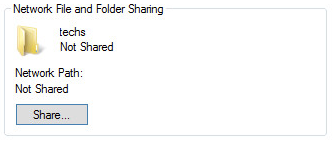
- Create a folder in the C:\ drive called "techs"
Right-click on the folder, select "Properties", and in the "Sharing" tab, click "Share…"
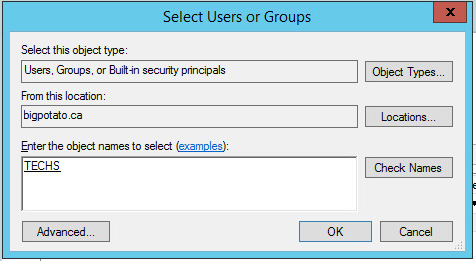
Click the arrow in the combo box that appears and select "Find people…"
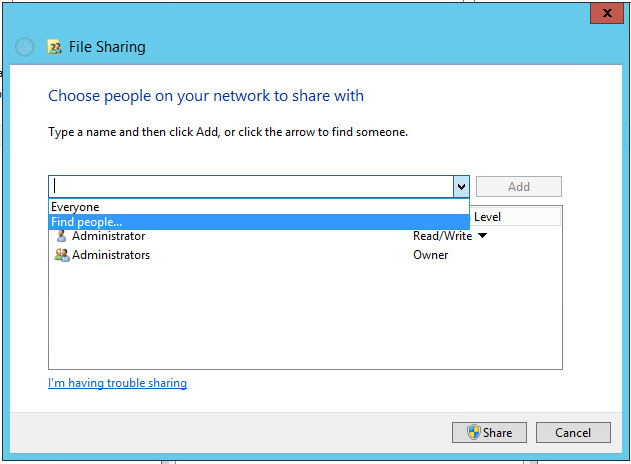
In the objects section, enter "techs" and click "Check Names". The object for the TECHS security group should appear, like so:
Click Share, and you should now be able to access the folder and its contents from all other machines in the domain via the file path \\CAL-DC02\techs

Populating the Domain with Objects
In this section, we will populate our servers with objects for users, organization units, and groups. For each location (Calgary, London, Minnesota), our goal is to create the following objects:
- 6 Users
- 3 Organizational Units (2 users in each)
- 3 Groups (2 users in each)
In the end, our domain will have 18 users, 9 organizational units, and 3 groups. In our scenario, each of the domain controllers will be responsible for creating the above list of objects for their own locations. Therefore, even though this section will only show the commands needed to create these objects in the Calgary location, all of the other locations will repeat these steps (but replace some values with their own location name).
Each location will name their objects with the prefix code for their location (i.e. CAL, LON, MIN).
Create OUs
The PowerShell commands to make organizational units are as follows:
New-ADOrganizationalUnit "CALOU1" -path "DC=bigpotato,DC=ca"
New-ADOrganizationalUnit "CALOU2" -path "DC=bigpotato,DC=ca"
New-ADOrganizationalUnit "CALOU3" -path "DC=bigpotato,DC=ca"
You can confirm your OUs were made with Get-ADOrganizationalUnit.
Create Groups
The PowerShell commands to make groups are as follows:
New-ADGroup -Name "CALGroup1" -GroupScope Global -Path "DC=bigpotato,DC=ca"
New-ADGroup -Name "CALGroup2" -GroupScope Global -Path "DC=bigpotato,DC=ca"
New-ADGroup -Name "CALGroup3" -GroupScope Global -Path "DC=bigpotato,DC=ca"
Create Users
We are going to use a CSV file to create our users. Create the following CSV file using notepad (and remember to name it with a *.csv extension):
Username,UPN,Path,Password
CALUser1,"caluser1@bigpotato.ca","OU=CALOU1,DC=bigpotato,DC=ca",Secret123
CALUser2,"caluser2@bigpotato.ca","OU=CALOU1,DC=bigpotato,DC=ca",Secret123
CALUser3,"caluser3@bigpotato.ca","OU=CALOU2,DC=bigpotato,DC=ca",Secret123
CALUser4,"caluser4@bigpotato.ca","OU=CALOU2,DC=bigpotato,DC=ca",Secret123
CALUser5,"caluser5@bigpotato.ca","OU=CALOU3,DC=bigpotato,DC=ca",Secret123
CALUser6,"caluser6@bigpotato.ca","OU=CALOU3,DC=bigpotato,DC=ca",Secret123
We named our CSV file users-info.csv. Navigate to the location you saved your file, and execute this command:
Import-Csv .\users-info.csv | ForEach { New-ADUser $_.Username -UserPrincipalName $_.UPN -Path $_.Path -AccountPassword (ConvertTo-SecureString -AsPlainText $_.Password -Force) -ChangePasswordAtLogon $true -Enabled $true }You can confirm that your users were created with Get-ADUser.
Add Users to OUs and Groups
Finally, we are going to add our users to the OUs we created earlier with the following PowerShell commands:
Add-ADGroupMember -Identity CALGroup1 -Members CALUser1,CALUser2
Add-ADGroupMember -Identity CALGroup2 -Members CALUser3,CALUser4
Add-ADGroupMember -Identity CALGroup3 -Members CALUser5,CALUser6
Confirm that the users were added to the correct groups with Get-ADGroupMember.
Conclusion
After following this report, you should have a fully configured Active Directory Domain Controller in multiple locations, all connected to the same domain. Those domain controllers will act as DNS and DHCP servers for its location. You will also have a web server in each location that serves specific information for that location. Finally, you should have many user accounts that can have different functions and privileges.
The PowerShell commands of this report should be particularly helpful in automating tedious processes that are repeated for each location. You now have the tools to expand an organization's Active Directory Domain, fictional or otherwise, into locations all over the world! Thank you for following along.
References
- How to Configure DHCP with PowerShell on FAQForge
- Installing IIS Components Windows Server 2012 on Laser Fiche
- Configure Reverse Lookup Zone with PowerShell – Windows Server Core 2016 on Read and Execute
- Lecture material by Robert Pearce from SYST 23551 – Windows Administration, taken at Sheridan College (2019)