Create A Raspberry Pi Web Server
Introduction
The purpose of this report is to explore how HTTP behaves as an Application layer protocol within the TCP/IP Protocol Suite. It will also explain the relationship HTTP has with TCP, and how TCP achieves reliable, connection-oriented communication within the Transport layer. This report will answer the question of why TCP is a more appropriate protocol for carrying HTTP than UDP.
This report will also outline the procedures necessary to host a local web server on a personal computer. The process will be explored from not only an application perspective, but also a networking perspective. Therefore, the objective is not just to be able to create a web server, but also to understand how they work and what is happening behind the scenes. This web server experiment will provide further insight into HTTP and TCP.
Overview of HTTP Protocol
What is HTTP?
Hypertext Transport Protocol (HTTP) is the application protocol that allows web browsers and web servers to communicate over the World Wide Web (WWW) [1]. It is a connectionless and text-based protocol. Essentially, it is through HTTP that clients, such as web browsers, are able to send requests to web servers and retrieve information such as a web page and images displayed on that site [1]. It is important to note that HTTP can also be used for other purposes, such as distributed object management systems [2]. That said, this report will only focus on HTTP in the context of the Web.
How does HTTP Work?
When a Uniform Resource Locator (URL) is typed into a web browser, there are actually quite a few things that go on in the background before the web page can be displayed. Here is how the browser turns a URL into a web page:
- A URL is typed into a browser on a client.
- The browser connects to a Domain Name Server (DNS) and requests the corresponding IP address, which the DNS will respond with [1].
- The browser then connects to the web server (HTTP server) at that IP address and sends an HTTP request for the desired web page [1].
- The HTTP server receives the request on the port (web servers usually listen on port 80* by default [1]), and makes a socket connection [3].
- The HTTP server looks for the page, and if it finds it, it will send it back to the browser. If it cannot find it, it will send an HTTP 404 error message [1].
- The web browser receives the page, and the connection is closed [1].
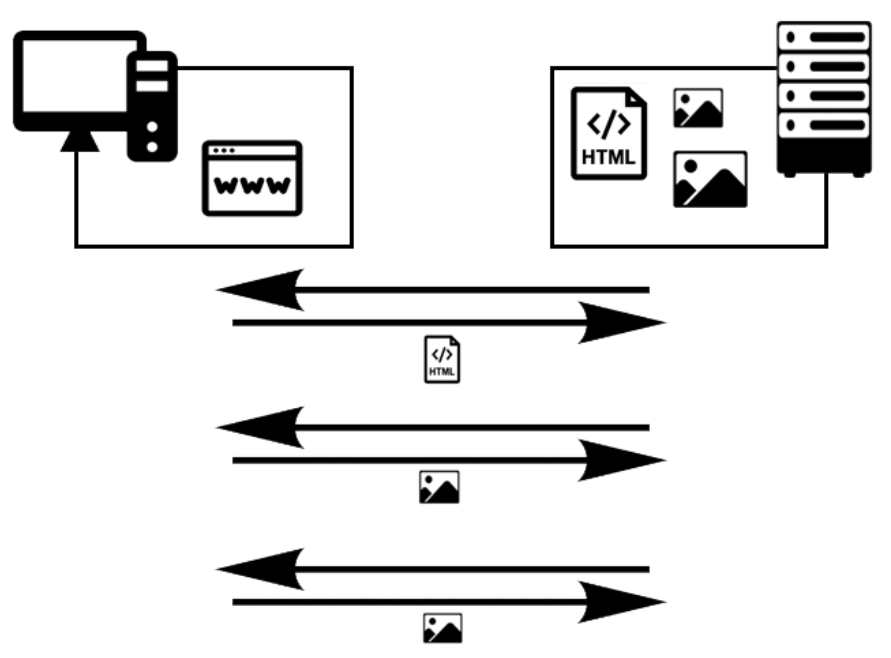
- As the browser parses the web page and finds other page elements that it needs from the web server (e.g. images, applets, etc.) it will create additional connections and requests for those elements [1].
- The process is repeated until everything on the web page is loaded and displayed on the browser's window [1].
*If the web server is Secure (HTTPS, i.e. SSL or TLS certificates), it will listen on Port 443.
After understanding how HTTP works, it is now possible to create a web server. The process begins in the following section.
Network Setup
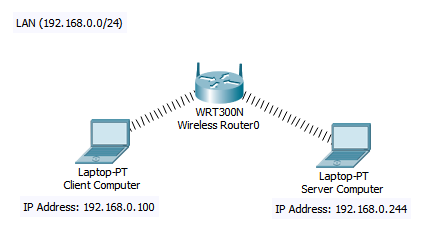
In order to recreate this particular setup, two computers are required. One will act as the client that runs the web browser, and the other will act as a web server to respond to HTTP requests. For the remainder of this report, these two computers will be referred to as Client Computer and Server Computer, respectively. The two computers will need to be connected to the same LAN network in order for this setup to work. The following diagram describes the setup used for this report.
Procedures
The following section describes, step-by-step, how to set up the web server, test it, and how to analyze the communication between the Client Computer and the Server Computer on Wireshark. It should be noted that the Client Computer used to create this report ran on Windows 10, and the Server Computer was a Raspberry Pi 3 B+ running on Raspbian GNU/Linux, Version 9. The commands used on the Server Computer should work for most Linux systems.
Server Installation
There are many open-source software projects out there that can easily turn a computer into an HTTP server. The HTTP server used in this report is the Apache HTTP Server Project. This software is available for Unix and Windows computers. With this software, a computer is able to provide a secure and efficient HTTP server that abides by the current HTTP standards [5]. Follow the steps below to install Apache2 on a Linux Machine.
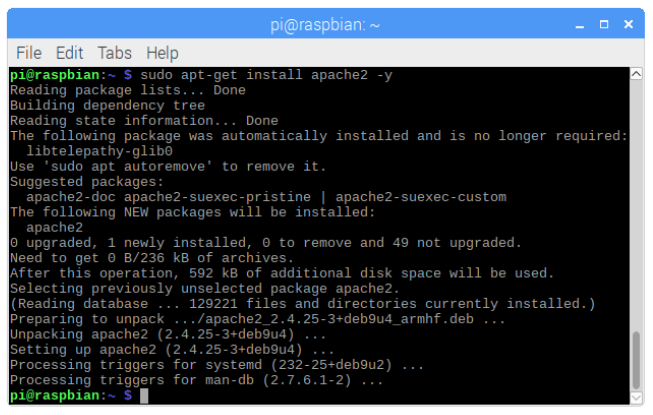
The installation process on a Linux machine is quite simple. Simply open the command terminal (shortcut CTRL + ALT + T), and type in the following command: "sudo apt-get install apache2 -y". If it was successfully installed, the output should look something like this:
Server Running
Find the Server Computer's IP Address
To ensure that everything worked perfectly, find the Server Computer's IP address by typing the command "hostname -I" on the terminal, and visiting that IP address on the device's web browser.

Visit the IP address from the Server Computer's web browser
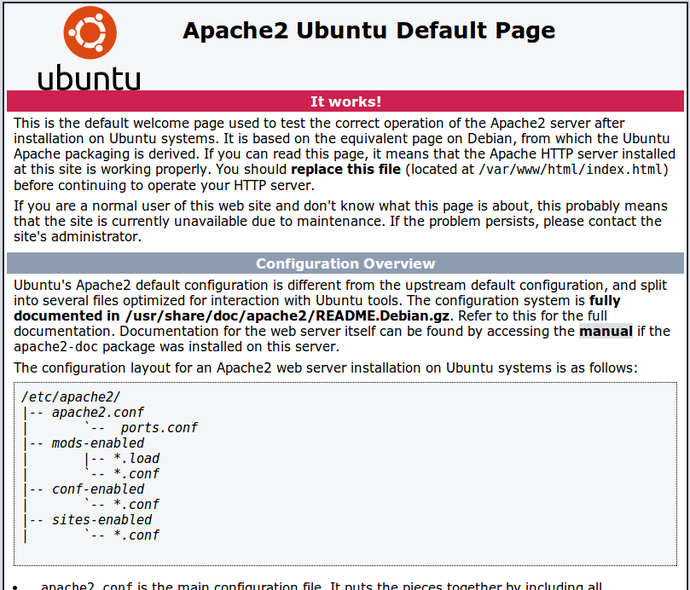
The IP address should display the Apache2 Default Page, which looks something like this [6]:
Webpage Hosted
Visit directory that holds the Default Page
Once the HTTP server is running correctly, it can display HTML documents to the local network simply by placing them in the appropriate directory. Visit that directory by typing in the following command on the terminal of the Server Computer: "cd /var/www/html".
Remove the default index.html from /var/www/html
Currently, the index.html which holds the Default Page from section 4.2 resides there. Feel free to delete or back-up that document somewhere else on the Server Computer. Just ensure that the current index.html is not in the directory /var/www/html
Write a custom index.html
Any index.html file that is placed in /var/www/html will be displayed when visiting the Server Computer's IP address. The script below is what was used in this report. Copy this script into index.html using any text editor (Raspberry Pi users can use leafpad) and save it.
<!DOCTYPE html>
<html lang="en">
<head>
<meta charset="UTF-8">
<meta name="viewport" content="width=device-width, initial-scale=1.0">
<meta name="author" content="Mariel Martinez">
<meta http-equiv="X-UA-Compatible" content="ie=edge">
<title>TELE13167</title>
<link rel="stylesheet" href="css/styles.css">
</head>
<body>
<header>
<h1>Assignment 2</h1>
</header>
<main>
<div class="container">
<p>Here is my website!</p>
<img src="images/pikachu.png" alt="Pikachu">
<br>
<img src="images/charmander.png" alt="Charmander">
<img src="images/bulbasaur.png" alt="Bulbasaur">
<img src="images/squirtle.png" alt="Squirtle">
</div>
</main>
<footer> Copyright © Mariel Martinez </footer>
</body>
</html>Write the styles.css file
Create a directory called "css" by running the command "mkdir css" within the /var/www/html directory. The CSS file below is what was used in this report. Copy this script into a file called styles.css in the css directory.
body {
  text-align: center;
  font-family: Arial, Helvetica, sans-serif;
}

.container {
  width: 80%;
  margin: 20px auto;
}

header {
  border-bottom: 1px solid black;
}

footer {
  border-top: 1px solid black;
  padding: 20px;
}Save images in the correct directory.
For this report, there were four images used. It is good practice to save those in a separate directory from index.html. Return to the html directory from the css directory by simply typing the command "cd .." and make a new directory with the command "mkdir images". If the html file in Step 3 was used, then four images with the following names must be saved in this directory: bulbasaur.png, charmander.png, pikachu.png, and squirtle.png.
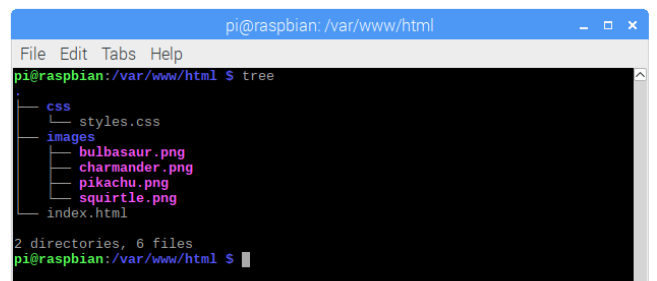
Ensure the file structure is correct
To ensure that the structure of this particular website is correct, return to /var/www/html by running the command "cd /var/www/html" and then running the command "tree". If Steps 3-6 were followed correctly, the output should look something like this:
Web Page Downloaded
Now that the HTML file, images and directories are in the correct place, visit the IP address of the Server Computer again. If the scripts provided in Section 4.3 were used, it should look something like this:
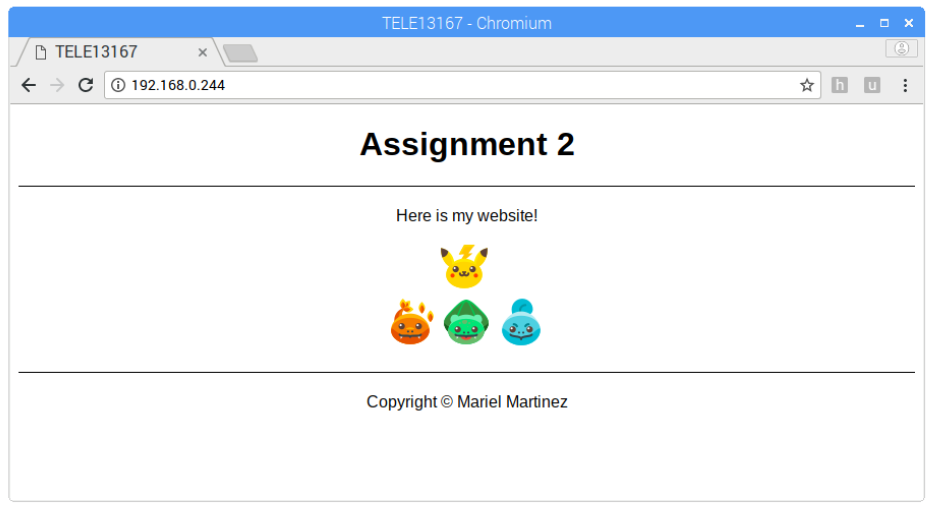
It is now possible to visit this web page through any computer that is connected to the same LAN as the Server Computer. The next section describes how to capture Wireshark Activity from the Client Computer.
Wireshark Activity
The steps in this section should be followed from the Client Computer. That said, the Server Computer must still be powered on in order for everything to work correctly.
Clear Cache
If, during testing, the IP address of the Server Computer was ever visited from the Client Computer, the Client Computer may have cached some images or files from the Server Computer's web page. When Wireshark is running, the goal is to be able to capture all the packets from communication. For this reason, the Client Computer's web browser cache should be cleared.
To clear the cache in Chrome, simply go to "Settings," type in "Cache," click "Clear browsing data" and select the option for "Cached images and files" (there is no need to clear browsing history or cookies).
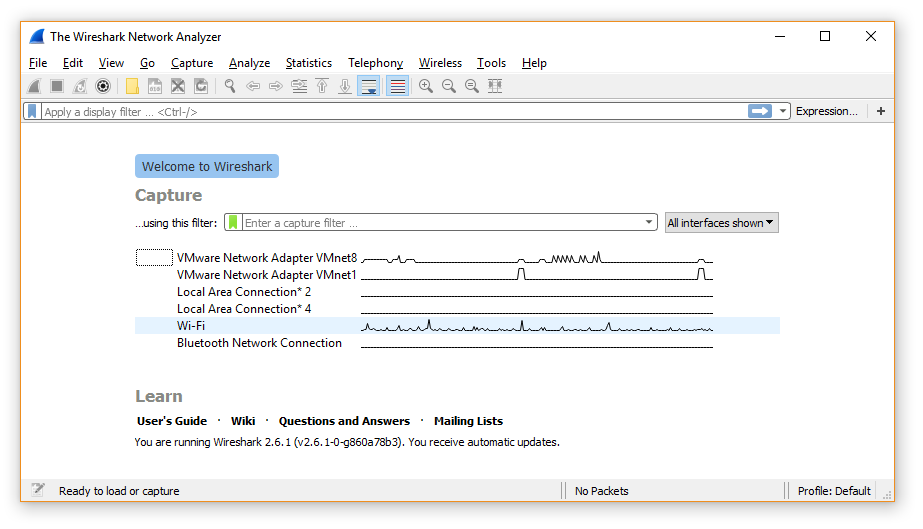
Begin capturing packets from Wireshark
Open the Wireshark Network Analyzer to capture packets from the HTTP requests that are about to be sent. If connected to the LAN via Wi-Fi, select that option:
Visit the IP address of the Server Computer
Without visiting any other websites, navigate to the IP address of the Server Computer from a web browser on the Client Computer.

Close Web Page and Stop Wireshark
Wireshark has now captured all the packets that are required for this exercise. Stop capturing by pressing the red square on the toolbar of Wireshark. The packets that were captured will be analyzed in the following section.
Observations and Analysis of Results
TCP Connection Set-Up
By the time the exercise is complete, Wireshark will have captured packets from many different types of connections. The packets which are important to HTTP can be filtered using the display filter "tcp.port == 80" [7]. The filter should look something like this:
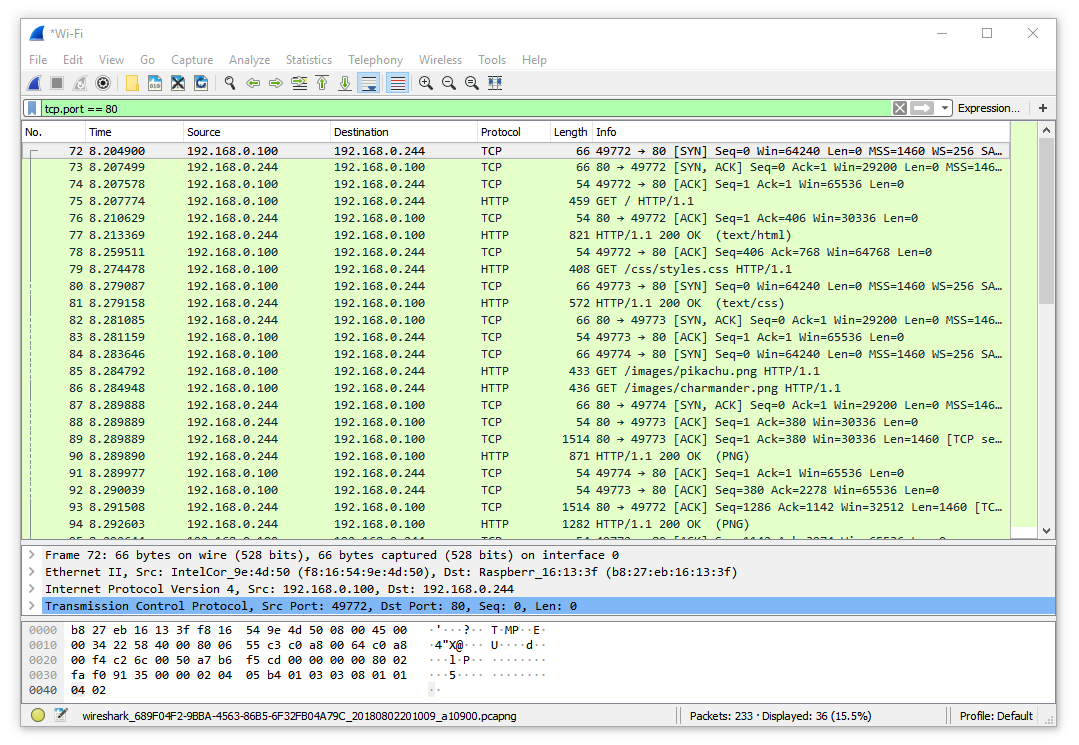
Notice that the two IP addresses shown in the display filter (192.168.0.100 and 192.168.0.244) correspond with the IP addresses of the Client Computer and the Server Computer from this network setup (see Figure 2). This is because the Server Computer's web page was the only website visited by the Client Computer during the capture session.
The TCP connection set up can be seen in the first three TCP packets in this display filter. The Source (Client Computer) sends a TCP packet with a SYN flag to the Destination (Server Computer), that is listening on port 80. The Server Computer responds with a TCP packet with an SYN and ACK flag up, and finally the Source replies with an TCP packet with an ACK flag up. This creates a reliable, full-duplex connection. Now, data can be reliably sent between the two computers. Notice that the first HTTP packet is only sent after this connection is made. Otherwise, it would not be a reliable connection.
3-Way Handshake
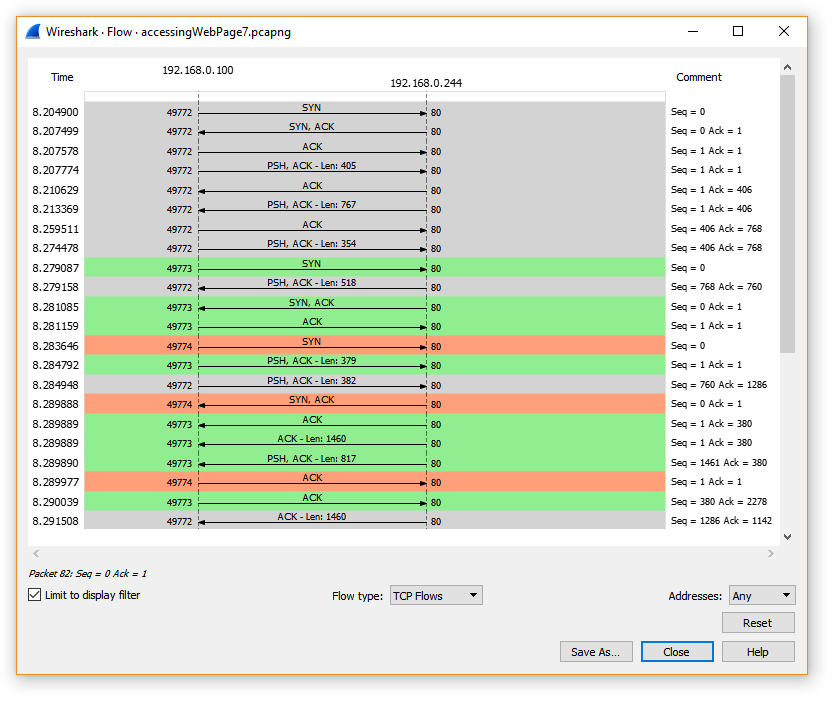
In order to easily see the 3-Way handshake, simply click "Statistics" in the tool bar, and then "Flow Graph." Then, ensure that the checkbox for "Limit to display filter" is on so that only the packets on Port 80 are shown. Then select the flow type "TCP Flows."
Notice in the figure below that there are three different colours. These denote different TCP connections that are being made between the Client Computer and the Server Computer. The first three packets in each of these connections corresponds with what one would expect from a three way handshake (SYN first, SYN+ACK, then ACK).
It was explained in Section 2 that there are multiple connections made between a client and a web server. A new connection is made for different images and files that are needed to load a full web page. As pictured above in the Wireshark capture, even for a simple web page like the one in this exercise, there are many http requests and responses that needed to be made to load the full page.
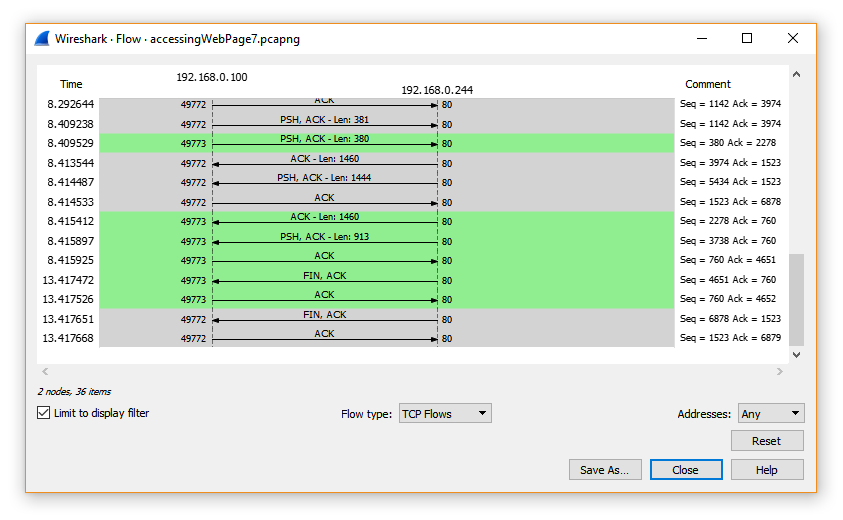
TCP Connection Teardown
A TCP connection is ended with a FIN flag in one of the TCP packets. See in Figure X below that the first FIN packet is sent by the Server Computer, and then acknowledged by the Client Computer. That happens once in green and once in grey. These are two separate TCP connections made between each computer that are closed separately.
HTTP Request/Reply
The HTTP Stream can be followed on Wireshark by right-clicking on an HTTP packet, selecting "Follow" and then "HTTP Stream".

This will open a window that will show the HTTP packets with the corresponding request/reply packet. In the figure below, the red packets are requests from the Client Computer, and the blue packets are replies from the Server Computer. The reply in the figure below contain Content-type that is text/html. This is actually the index.html file that will be displayed by the browser. The subsequent replies and requests would contain the data for the four images that are displayed on the webpage and even the styles.css file.

Conclusion
Overall, this exercise showed how much goes on behind the scenes when visiting a website. There were many different connections that needed to be made to ensure that the data was properly sent from the Server Computer to the Client Computer. It was important that these HTTP requests were made on top of the TCP protocol, otherwise data may have been lost. This exercise provided a good practical example to help explore the HTTP protocol and see how data is sent to web browsers.
References
- Schuler, R. (2018). How Does the Internet Work?. [online] Web.stanford.edu.
- Kristol, D. (n.d.). HTTP. [online] Silicon-Press
- Chung, L. (n.d.). Client-Server Architecture. [online]. University of Texas
- Instant SSL (n.d.). What is HTTPS?. [online]. Instant SSL.
- Apache Software Foundation. (2018). HTTP Server Project. [online]. Apache.
- Fan, H. (2017). Setting Apache Virtual Hosts in Ubuntu 17.04. [online]. Medium.
- Meier, B. (2011). Hyper Text Transfer Protocol. [online] Wireshark
- Wolf, I. (n.d.). Creating a Raspberry Pi 3 Model B Web Server. [Online]. The Info Wolf
- Lecture material by Tarek El Salti from TELE 13167 – Intro to Data Communications and Networking, taken at Sheridan College (2018)