Windows Domain Services
Introduction
The following report will describe what Windows Deployment Services (WDS) is, and how it works. It will give a detailed description of the history, use cases, software and hardware requirements needed, and benefits of using WDS. The next portion of this report will give the steps on how to configure a Windows Server with DHCP and DNS, which are needed for WDS. It will also configure WDS. The final section will implement WDS in a virtual environment, and will show the steps of how to capture the image of a Windows 8.1 OS and push that image to a blank virtual machine. By following this report, you will have the knowledge to use and implement WDS in your own environment.
The environment that this report is using contains the following components:
- 1 x Router running pfSense
- 1 x Server 2012 R2 Standard with GUI
- 1 x Windows 8.1 Client (this will serve as the gold master)
- 1 x Blank Virtual Machine with no OS installed (this is what we will push the Windows 8.1 image to)
The environment in this report is running off the server virtualization platform called VMware vSphere. That said, the steps within Part 2 and Part 3 can be followed on any physical machine, and the image that is captured can be pushed to any number of blank machines.
What is Windows Deployment Services?
Windows Deployment Services (WDS) allows users to deploy Windows operating systems using network-based installation, without the need of physically visiting each computer [1]. In the situation described above, instead of having to touch each laptop individually and install the OS with physical media, you could use WDS to install Windows over the network!
History
Before WDS succeeded it, Microsoft had a feature included in Windows 2000 Server called Remote Installation Service (RIS). RIS allowed network administrators to install Windows 2000 Professional operating system and its upgrades to any number of client computers at one time from a centralized controller [2]. Unlike WDS though, RIS does not use disk imaging [3]. Because of this, RIS was only able to install a limited number of operating systems, whereas WDS is able to support Windows Vista, Windows 7/8/10, Windows Server 2012/2016, and more.
How It Works
As mentioned above, WDS uses imaging in order to deploy operating systems. Imaging is the process of taking a snapshot of the whole hard disk of any computer or server, and storing it to a file. This single file contains an entire OS installation [4]. WDS takes that image and is able to deploy it to multiple computers over a network at the same time. Imaging is the reason that WDS does not need to have any physical media involved.
Benefits of WDS
Below are some reasons to choose WDS over manual or other deployment methods [5][6]
- Saves system administrator time in deploying the operating system
- Reduces complexity and cost
- Transmits the data using multicast functionality which reduces network congestion
- Allows you to create a reference image of a computer using its Image Capture wizard
- Allows you to deploy driver packages to client computers along with install images
- Can be used to transition workstations and servers with a previous operating system to Windows Vista and Windows Server 2008
- Offers improved management capabilities: WDS can be managed both from an MMC snap-in and through the command line with WDSUTIL.EXE
- Integrates with Active Directory
Software and Hardware Requirements
The following components are required in order to use WDS [7]:
- Server running Windows Server 2003 SP1 (Windows Server 2008 or newer highly recommended)
- DHCP services running on the network
- DNS services running on the network
- Storage drive(s) formatted with NTFS for storing deployment images
- Active Directory Domain Services (Optional, Standalone mode may be used unless choosing to run WDS in Integrated mode, which does require being a member of the domain or DC)
- Administrative credentials
Please note that while Active Directory Domain Services is optional for WDS, this tutorial will show the steps of how to configure DHCP and DNS on an Active Directory Domain Controller in the next section.
Configuring Windows Server with DNS, DHCP, and WDS
Now that we understand what WDS is, how it works, and why it would be beneficial, let's jump into how to install and implement it into your Windows Server. As mentioned in the previous section, we will need DNS and DHCP configured in order to use WDS. For our purposes, we are going to be using a Windows Server that is an Active Directory Domain Controller. If you already have ADDS, DNS, and DHCP installed and configured, you can skip to the final part of this section.
Active Directory
This section contains a list of PowerShell commands that will configure your Windows Server, install Active Directory, and promote it to a Domain Controller. Simply copy and paste the blue commands into your PowerShell console. This section is essentially a summary of SYST 23551 Assignment 1, so if you want more information on this process, you can take a look at that report.
Set IP address:
New-NetIPAddress -IPAddress 10.100.50.2 -PrefixLength 24 -DefaultGateway 10.100.50.1 -InterfaceAlias Ethernet0- The network address for this IP address is simply 10.100.50.0/24; ensure that your router is configured appropriately and has the IP address 10.100.50.1
Set time zone:
Tzutil.exe /s "Eastern Standard Time"Rename computer:
Rename-Computer -NewName DC01Restart computer to finalize renaming:
Restart-ComputerInstall Active Directory:
Install-WindowsFeature -Name AD-Domain-Services -IncludeManagementTools -IncludeAllSubFeaturePromote to Domain Controller:
Install-ADDSForest -DomainName "mariel.ca"- This will create a domain called mariel.ca, so replace this with your own domain name
DNS
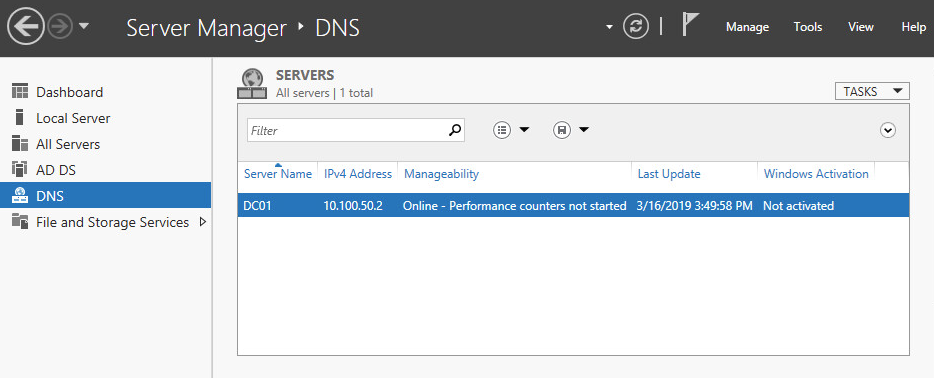
The commands above will have installed DNS with Active Directory by default. To see if DNS was installed successfully, you can check Server Manager. It should appear at the side like so:
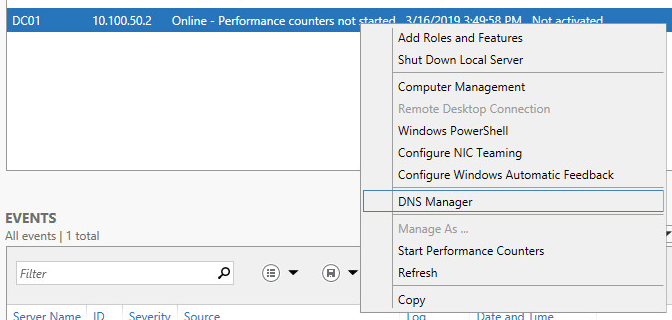
The next step is to configure DNS. In order to do so, you will need to open DNS Manager by right-clicking on the white space on the left, and selecting DNS Manager:
Create a Reverse Zone
Configuring a reverse zone is not something that the average Windows Server user will typically need. However, in cases where it is necessary, it is best to do this step before configuring any other DNS settings. This will save you from some tedious backtracking in the long-run. If you know for sure that you will not need a reverse zone, then you can skip this section.
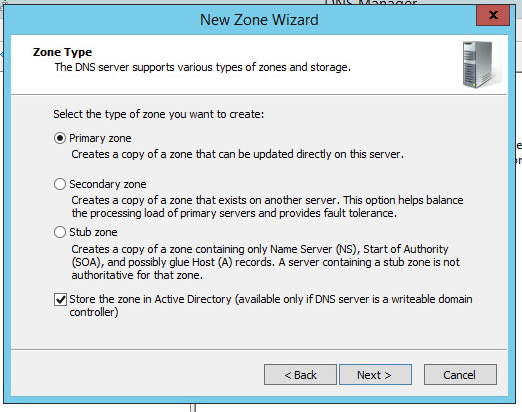
To create a Reverse Zone using GUI, look at the toolbar in DNS Manager and select Action > New Zone. This will open the New Zone Wizard. When reaching the Zone Type section, select Primary Zone and the checkbox to store the zone in Active Directory. These are the default options below.
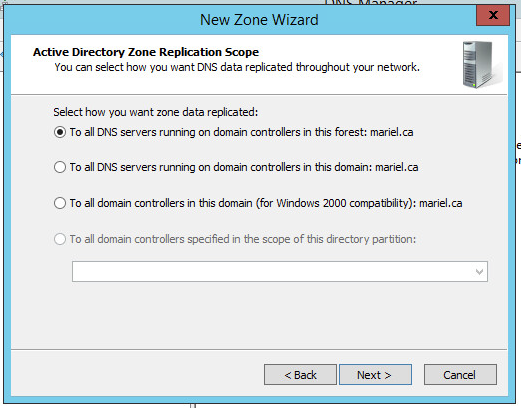
When selecting Active Directory Zone Replication Scope, your choice depends on your needs. In our case, we only have one server which comprises our entire forest. Therefore, option A and B below are essentially the same thing. However, with environments with multiple trees and domains, then this choice will have a much bigger impact. What it comes down to is thinking about how far do you want this zone information to go: across this domain, or across the entire forest? In our case, we are simply choosing the default option "To all DNS servers running on domain controllers in this domain".
For Reverse Lookup Zone Name, just select the default again: "IPv4 Reverse Lookup Zone".
Next, the wizard will ask for the Reverse Lookup Zone Name. The only thing you need to input is the network ID for your network. In our case, this is 10.100.50.0. You will only need to enter the bits that are part of the network mask, which is only the first 3 bytes:
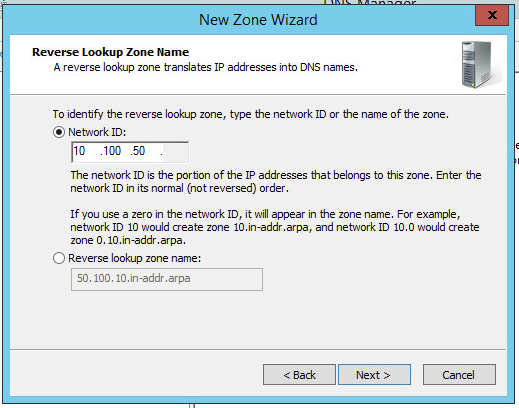
The Reverse lookup zone name will be generated automatically for us.
Choose the default option in the next page again (Allow only secure dynamic updates).
The final page of the wizard will confirm the settings you selected. Click "Finish" and the new reverse zone will have been created.
Create an A Record (Forward Lookup Zone)
In this section we will create an A record for our server. This means that DNS will be able to retrieve the IP address from a domain name. We will create an A record for our router.
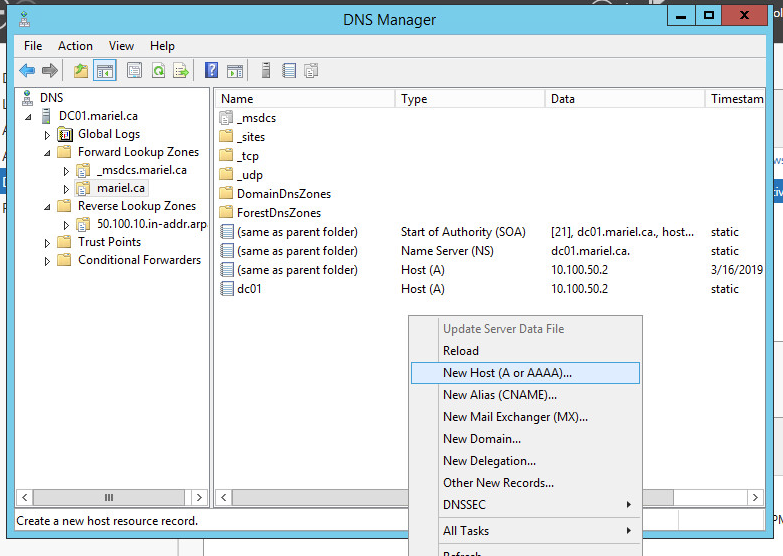
In DNS Manager, open the containers on the left like so: DC01.mariel.ca > Forward Lookup Zones > mariel.ca, and right click in the whitespace on the right and select "New Host A or AAAA":
Since this record is for our router, the name is just router. The IP address is 10.100.50.1. We will also select "Create associated pointer (PTR) record"; this will create an entry in reverse lookup zones.
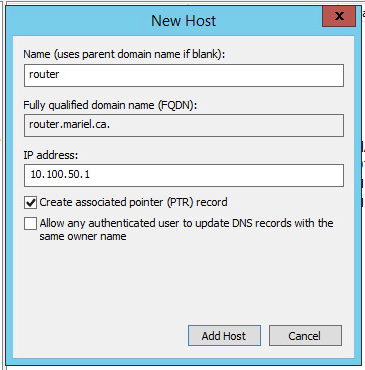
Click "Add Host" and the record will be created for router. Test that it worked correctly by opening a command prompt and entering the command "ping router", which should be successful.
DHCP
The next requirement for WDS is DHCP. We will install DHCP on our server and configure it with GUI below.
Install DHCP
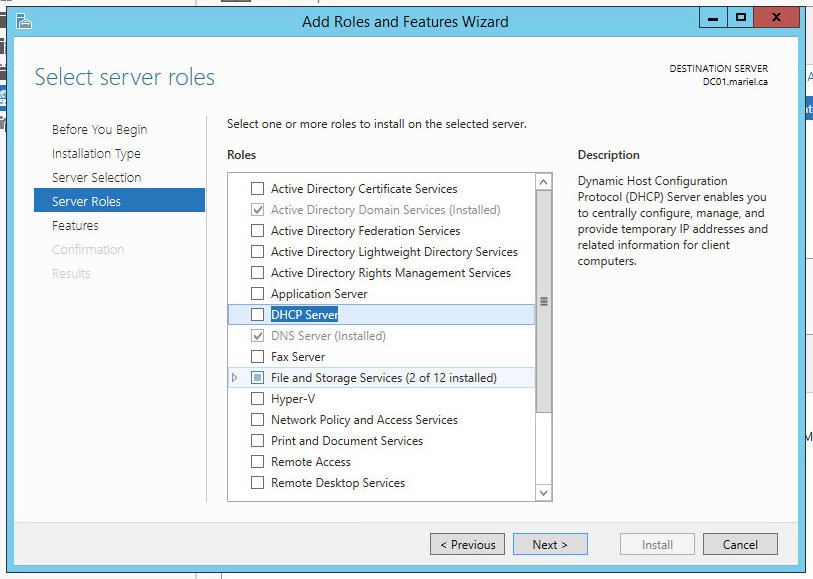
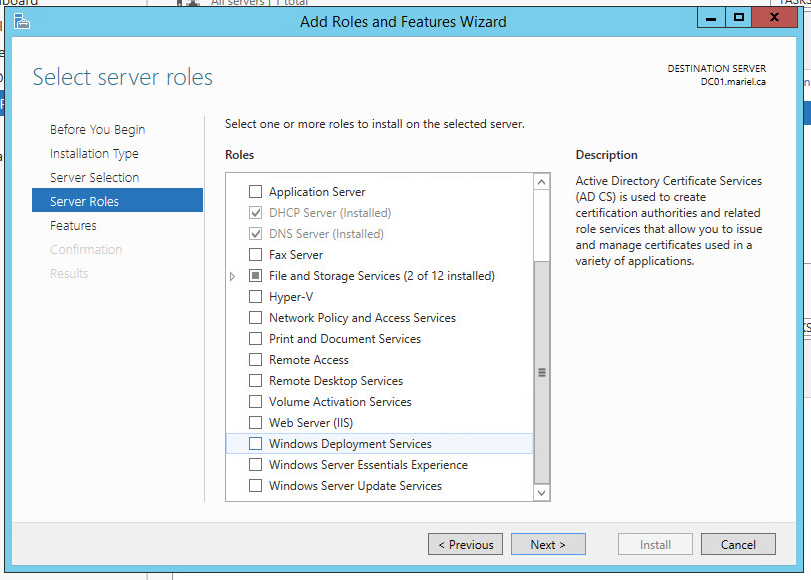
Go to Server Manager, and under Manage, select "Add Roles and Features" to open up a wizard. "Select Role-based or feature-based installation" as the installation type, your server from the server pool, and when you reach "Server Roles" select the checkbox for DHCP server, like so:
Select "Add Features" in the window that pops up. This will install any prerequisite tools that are required before you can install DHCP.
Keep clicking "Next" in the wizard, keeping each option at its default value. When you get to the final window, click "Install", and wait for the process to finish.
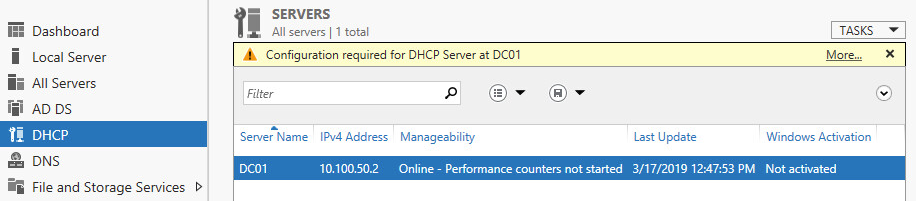
In the menu on the left of Server Manager, DHCP should have appeared. Click on it, and you should see a warning telling you that DHCP requires configuration. Click "More…" to configure.
In the window that pops up, you will need to click "Complete DHCP configuration", which will open the DHCP Post-Install configuration wizard. Simply keep everything at its default value, click "Commit", and close the window when everything is done.
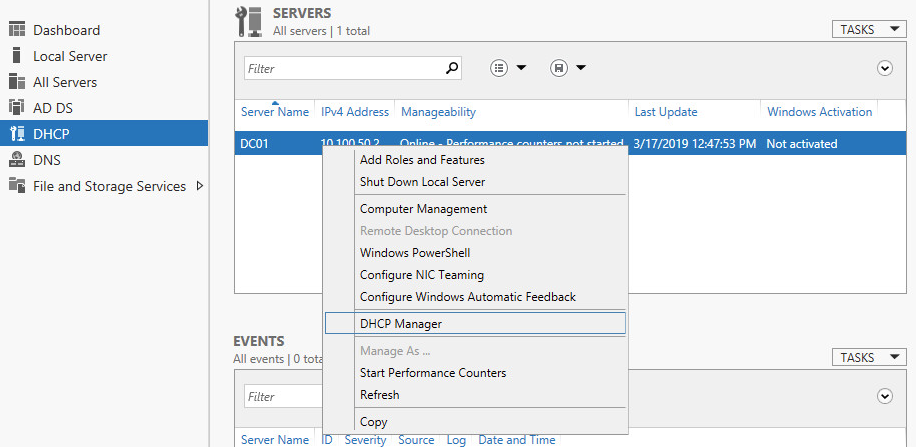
You should now be able to open the DHCP Manager in the same way we did for DNS Manager. Simply right-click on your DC01 server in Server Manager (under DHCP), and select "DHCP Manager", like so:
Configure DHCP
In DHCP Manager, we are now going to create a new DHCP scope using another wizard. Open this up by looking at the toolbar, and selecting Action > New Scope.
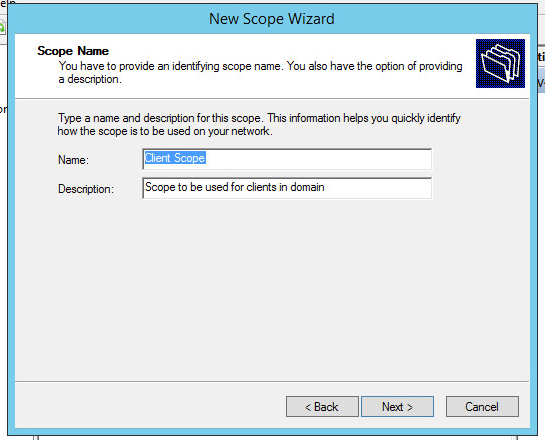
You can name your new scope anything you want. In our case, we will name it "Client Scope" and describe it as "Scope to be used for clients in domain".
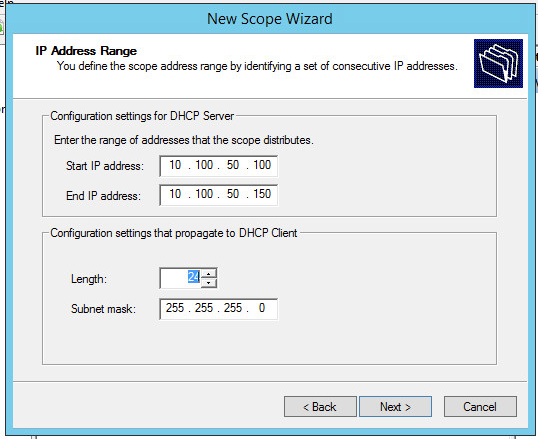
When selecting the IP Range, we are going to use the range 10.100.50.100 to 10.100.50.150. Be wary of the default configuration settings. Be sure to change the length to 24 before clicking "Next".
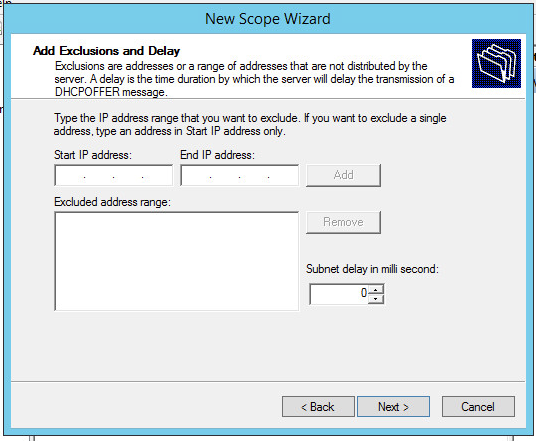
The next page is to Add Exclusions and Delay. We do not need exclusions in our environment and we will keep the subnet delay at 0 for this example. Therefore, we're essentially skipping this page.
Next, we will be asked for lease duration. The default for this will be 8 days. Since I am working on a virtual network, I am going to keep this at the default 8 days.
The next page will ask if we want to configure the DHCP options for this scope now. Select "Yes" and click "Next".
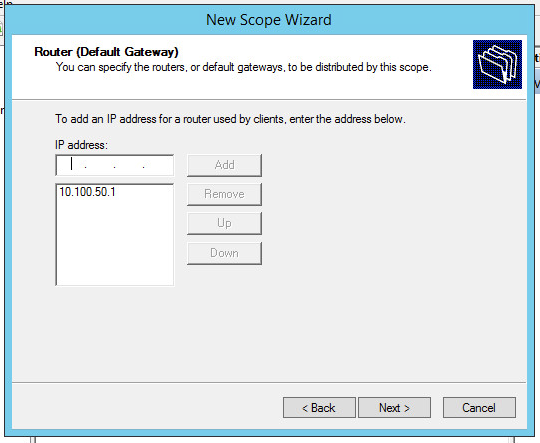
The Router (Default Gateway) will have an IP address of 10.100.50.1. Enter that in the text box, and make sure to click "Add" before going to the next page.
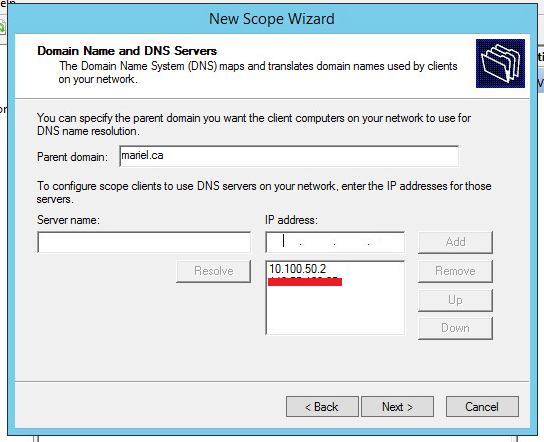
The next page will ask for the domain name and DNS servers. Since this server is tied to active directory, it has already recognized what we need. You can add the specific address you need for internet connectivity here.
The next page asks for WINS server, we will not need to do anything there, so just click "Next".
When asked if you want to "Activate Scope", select Yes.
When you reach the last page and click "Finish", you will be able to see everything we added in the DHCP manager.
WDS
Now that DNS and DHCP are installed and configured, we can finally get into the meat of this report and start working with WDS.
Installing WDS
The process of installing is going to look very similar to when we added DHCP as a role. From Server Manager, go to Manage and select "Add Roles and Features". Again, select the default options until we get to the Server Roles page. Look for "Windows Deployment Services" and select that checkbox.
Again, select "Add Features" when prompted to add all prerequisite features you need before configuring WDS. Keep choosing "Next" and keeping things at their default values. Confirm and click "Install" when prompted.
Like DHCP before, after the process is finished, we should see WDS show up in server manager. To start using WDS, we are going to right-click on DC01 and launch "Windows Deployment Services Management Console". We will be working in this console in the next section.
Implement WDS to Capture Image Push to a Blank Client
If you followed along to Part 2, you should have DNS, DHCP, and WDS installed on your server, and be able to open your Windows Deployment Services Management Console. This next section will show you how to configure WDS and prepare your gold master Windows client to be captured.
Configuring WDS
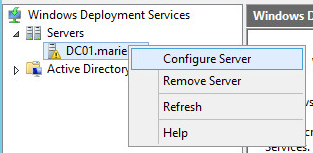
In the Windows Deployment Services Management Console, we are going to start by integrating WDS with Active Directory. When you open up the containers for Servers, you will see that there is a small warning symbol beside your server. Right-click on your server and select "Configure Server".
In the wizard that opens, click "Next" and select the install option called "Integrated with Active Directory".
You will then be asked for the path to the remote installation folder. At this point, it is important to note that ideally, this Path should be on a separate drive from your OS. For my purposes, I am going to just install the path on my C:\\ drive. In a production environment, this is absolutely not recommended. For yourself, you should map to another drive.
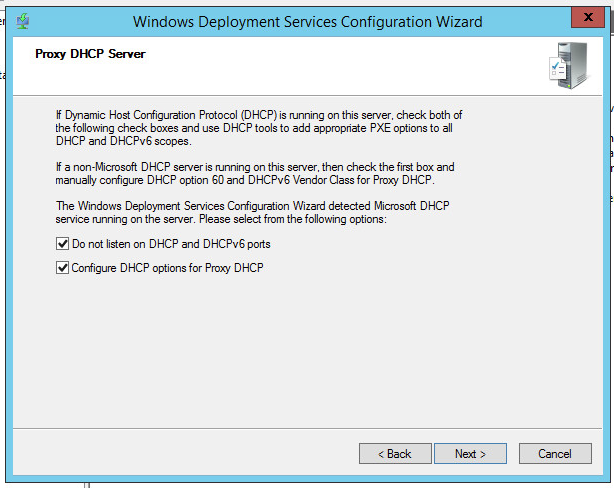
The next page will ask for Proxy DHCP Server settings. The proxy server should be checked automatically because we configured DHCP in the previous section. Therefore, keep everything as it is and select "Next".
The next page is for PXE Server Initial Settings. We are NOT going to use the default settings on this page. We are going to select "Respond to all client computers (known and unknown)".
After clicking "Next", you should see a quick load screen. Click "Finish", and we will fix any remaining issues.
The wizard should close, and you should see DC01 with more containers in the management console. But, there will be a black square on it. This means that it is not running. Therefore, right-click on your server, go to All Tasks and select "Start".
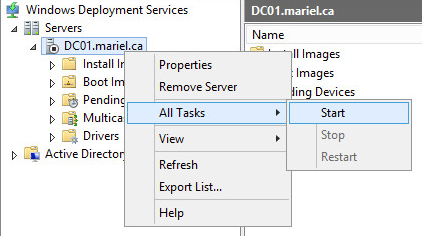
The WDS service should start, and you will see a little green play button on your server.
Adding a Boot Image
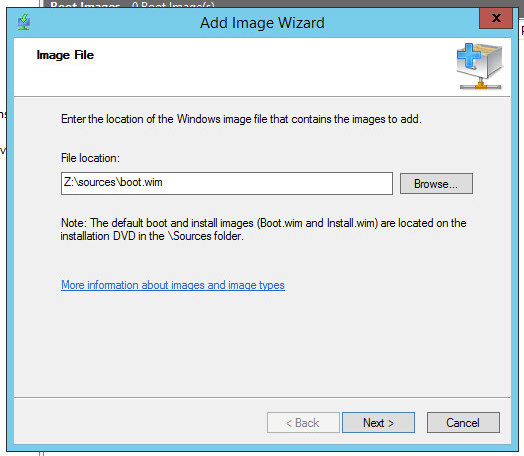
Now that WDS is running, we are going to open up the containers in DC01 until we get to the folder called "Boot Images". You will see that there are no items to show, because we have not added a boot image yet. Right-click in the blank space and select "Add Boot Image…".

You are obviously going to need a boot image for this step. You will need a boot.wim image for your own purposes, so browse and navigate to the folder you have it.
At the Image Metadata page, I will use the name and description "Deploy / Install".
In the summary page, confirm the information and click "Next". A task will begin to add the boot image to your server. You should now see the boot image in your WDS management console.
Boot Configuration
Now that the boot image is installed, we are going to need to configure a boot policy. To change this, we are going to right-click on our server and select "Properties".
Within the property windows, go to "Boot", and change the Boot Policy to "Continue the PXE boot unless the user presses the ESC key" for BOTH Known clients and Unknown clients. We want this for both because the gold master Windows 8.1 client is an unknown client currently.
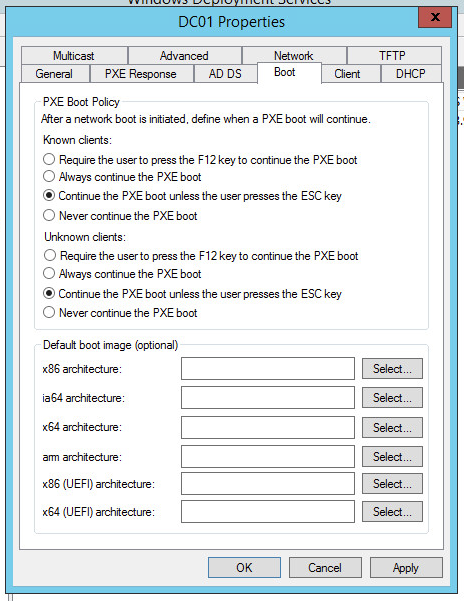
Because we've made changes to the service properties, we should restart WDS. Do this by right-clicking on your server, going to "All Tasks" and selecting "Restart".
Capturing Windows 8.1 Client Image
Create Capture Boot Image
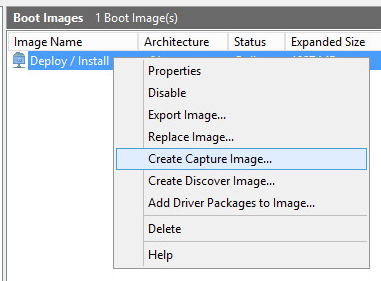
We previously created a boot.wim image. We are now going to use that file to create a capture image. To do so, right-click on the "Deploy / Install" image under boot images, and select "Create Capture Image…".
Enter the image name and description as "Capture". Then, add the location and file name. Save it to C:\RemoteInstall\Boot\x64\Images\capture.wim. This is the same location as boot.wim.
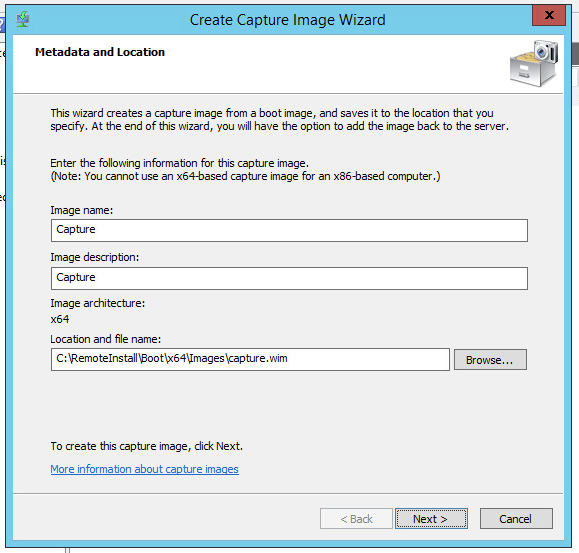
A task will then begin that will create the image. When it is done, select the checkbox option "Add image to the Windows Deployment server now", and "Finish".

Enter the appropriate metadata in the prompt. When you are done, you should see the new capture image under Boot Images.

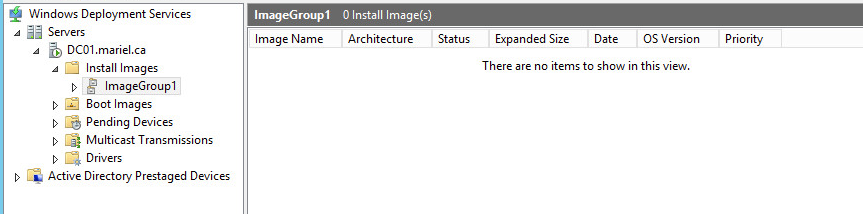
Next, we will need to create an image group. Simply go to the "Install Images" folder within your WDS console manager and right-click on the blank space. Select "Add Image Group". I simply named mine "ImageGroup1".
Fixing the Winload.exe Error
While we are still working with your WDS server, we are going to get ahead of a problem that will surely happen. If you were to skip this section and try to capture your Windows 8.1 client now, you will encounter the error below:
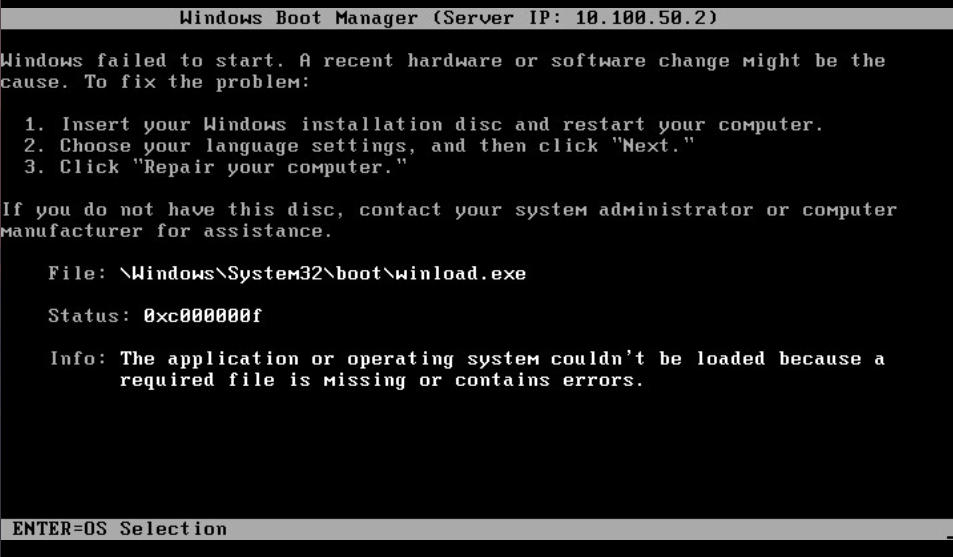
Essentially, one of the Windows updates interferes with WDS being able to create a capture image, and triggers this error. To avoid getting this error yourself, we're going to use the DISM utility.
Essentially, all you need to do is mount and remount your capture image in a folder on your server. First, you will need to go into your C:\ drive and create a temporary folder to which we will mount our image. My folder is C:\MountDir.
Next, open up a command prompt with administrator privileges. In order to mount our capture.wim image, enter the following command:
dism /mount-wim /wimfile:"C:\RemoteInstall\Boot\x64\Images\capture.wim" /mountdir:"C:\MountDir" /index:1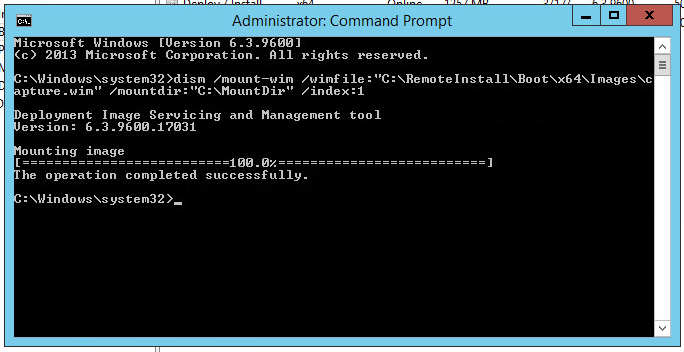
Now, we just need to unmount that image and commit any changes. The command to do so is as follows:
dism /unmount-win /mountdir:"C:\MountDir" /commit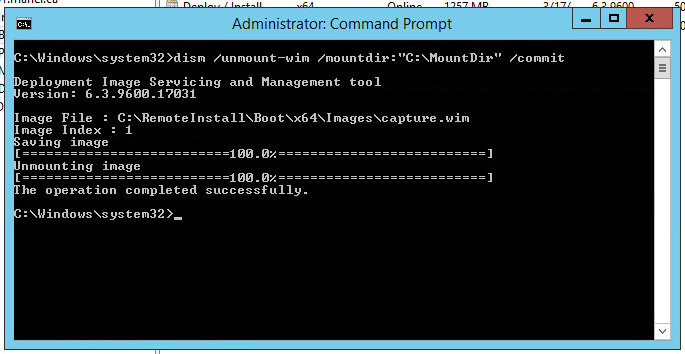
This simple process will fix the winload.exe error that the capture image would otherwise trigger.
Starting Capture
In the previous sections, we have been working on our Active Directory server. Now, we can finally turn on our gold master Windows 8.1 Client and prepare it for capture.
First, we must ensure that our client will open into BIOS. Booting into BIOS will be different depending on your machine.
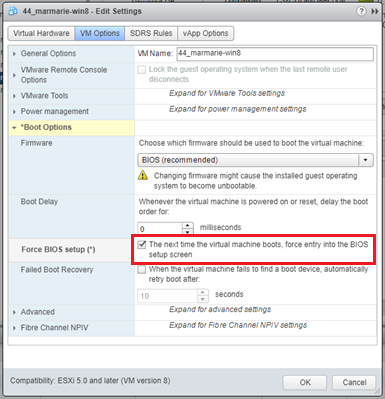
Editing Boot Options on vSphere
For any vSphere users, we will need to right-click on the Windows 8.1 VM and select "Edit settings". Under the "VM Options" tab, we will expand the "Boot Options" section. We are going to select the option to boot into BIOS the next time we power on the machine.
BIOS
Now, power on the Windows machine into BIOS. Navigate to the "Boot" tab, and highlight "Network boot from Intel E1000e". Press SHIFT and PLUS until that option is at the top.
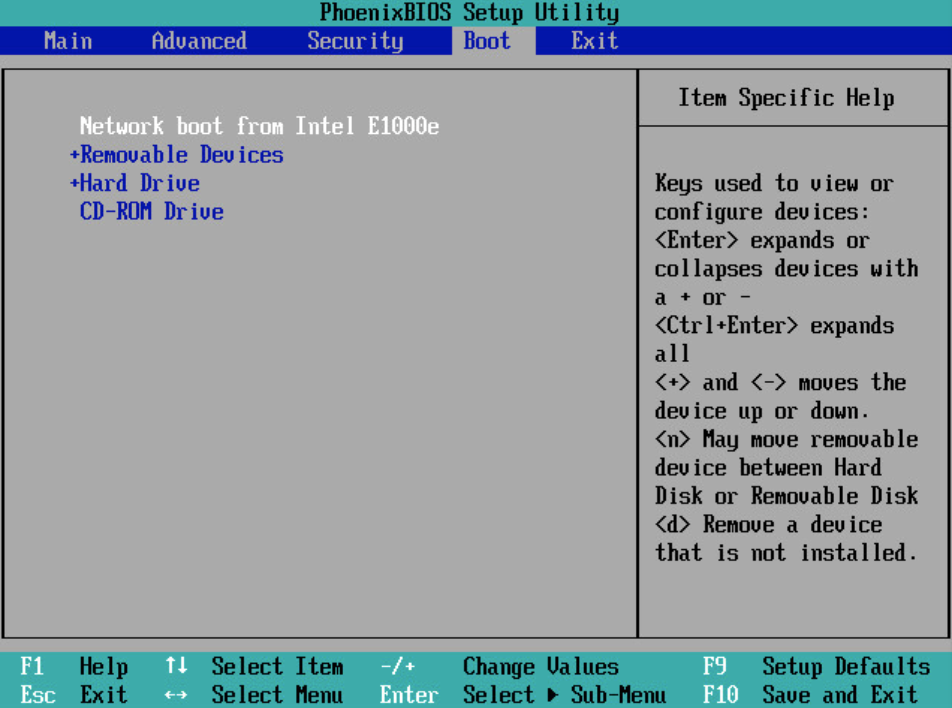
Next, navigate to the "Exit" tab and select "Exit Saving Changes". The client will now restart and go into network boot.
Booting Up the Win 8.1 Client
When your client restarts, you should see something similar to this:
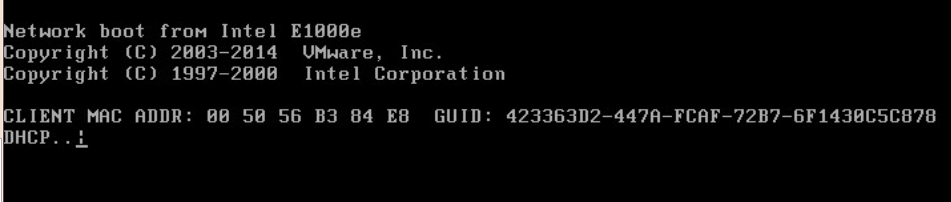
What's happening is that your client is making a DHCP request to your server. After some time, you should obtain a client IP address, and see the output below:
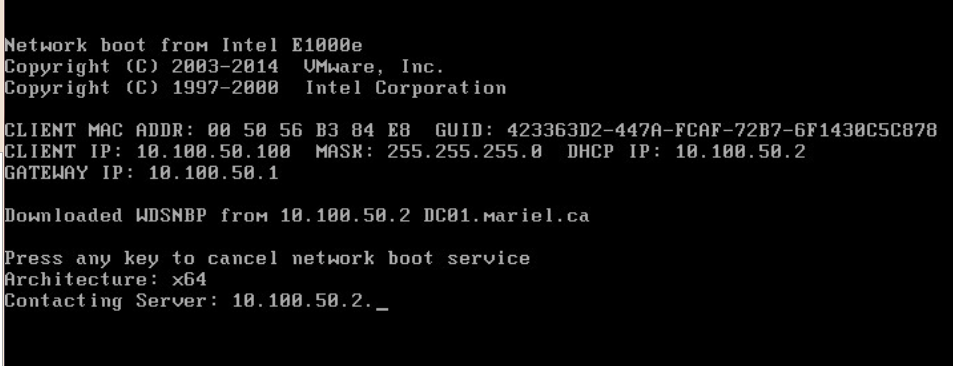
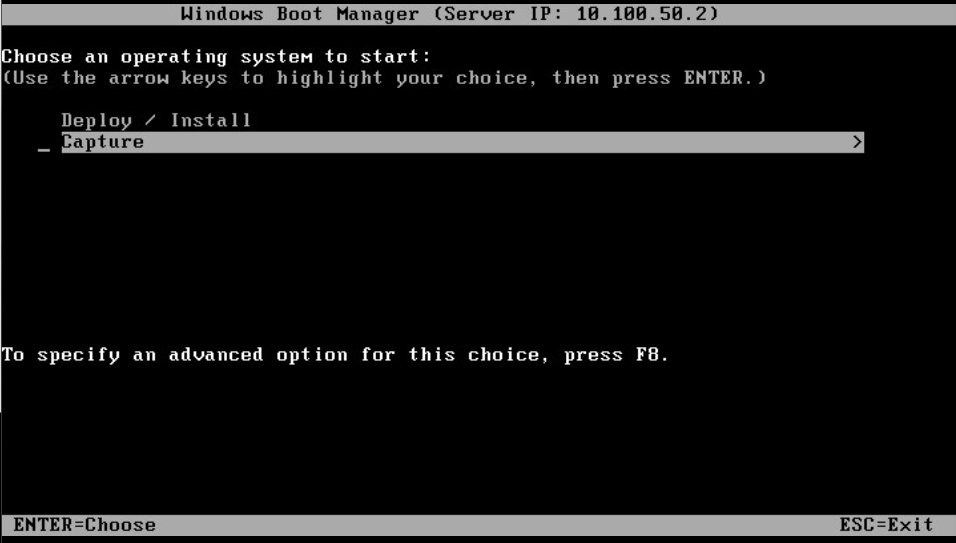
You should now have the option to choose an operating system to start. You'll see the two images that we added to WDS here. Select "Capture".

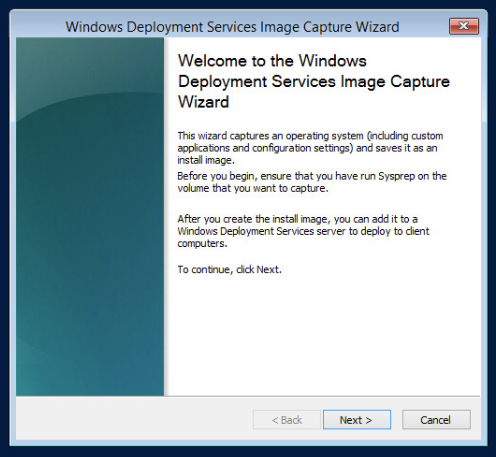
You will now launch into the WDS capture wizard.
Capture Wizard
Please note that throughout this section, you will not have access to your mouse cursor. You will need to navigate through this wizard using the TAB key to move between options, and ENTER to select an option. The capture wizard should open into a welcome window:
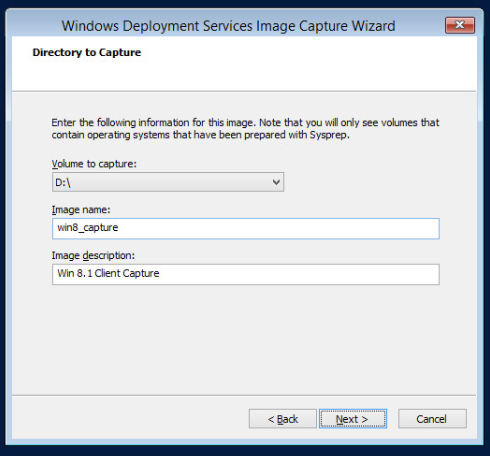
When you click next, you will be prompted to choose a directory to capture from. Only volumes that contain operating systems prepared with sysprep will appear. For me, that is the D:\ drive. Name your image and give it a description that is appropriate for your needs.
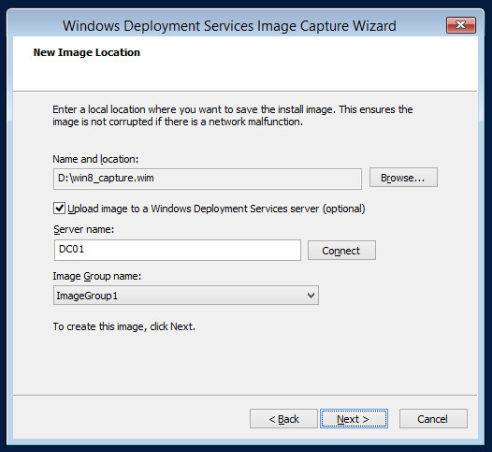
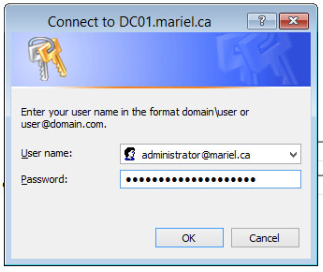
Next, we will need to specify where the install image will be saved to [9]. I simply browsed to the D:\ drive and named it win8_capture.wim. Then, select the optional option to upload the image to WDS. Enter your server name (DC01), and select "Connect". You will need to enter your fully qualified administrator user name (e.g. administrator@mariel.ca) and the appropriate password. After entering your credentials, select ImageGroup1 (which we created on the WDS server in the previous section).
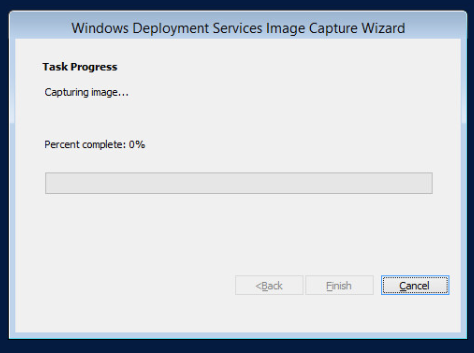
When you select next, the task of capturing your Windows 8.1 client will begin. Depending on your environment and resources, this may take a long time. Maybe grab a snack while you are waiting for this step to complete!
When your capture is ready, you should see this screen:
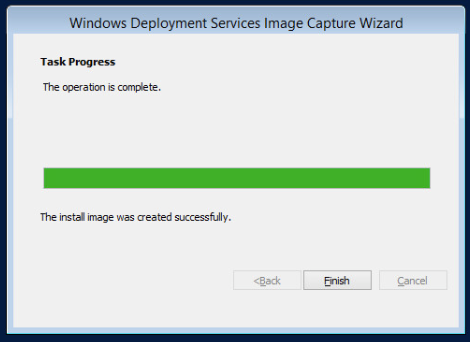
Click "Finish", and head over to your WDS server. Within the WDS management console, you should see the win8_capture image under ImageGroup1:

Pushing Our Image to the Blank Client
Now that we have successfully captured the Windows 8.1 image, we can now deploy that onto our blank client. The first step is to power on your blank client into BIOS.
From BIOS, do the same thing as with the Windows 8.1 client (i.e. move "Network boot from Intel E1000e" to the top of the boot options and then "Exit Saving Changes".
You should see the blank client network boot, and obtain an IP address using your DHCP server. Now instead of selecting "Capture", select "Deploy / Install"

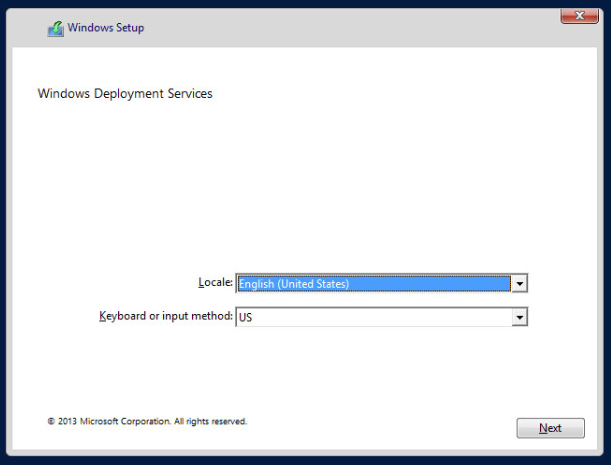
You will now see a Windows Setup wizard appear.
Setup Wizard
Again, we may only navigate this wizard with the keyboard. With that in mind, select "Next".
Enter your credentials like so:
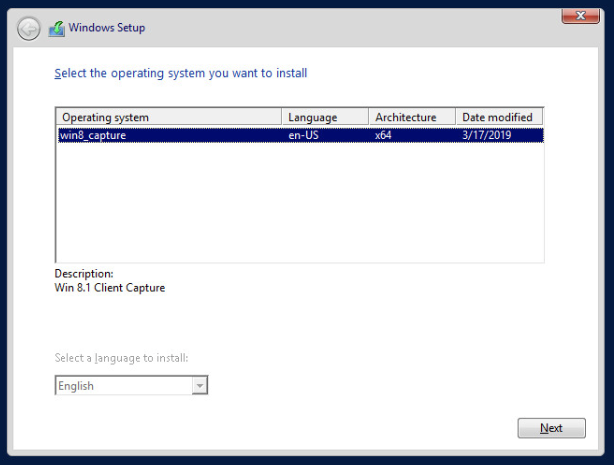
You should be able to see the win8_capture image. Select it and press "Next".
Choose the drive you want to install Windows on and select "Next". The installation process should begin.
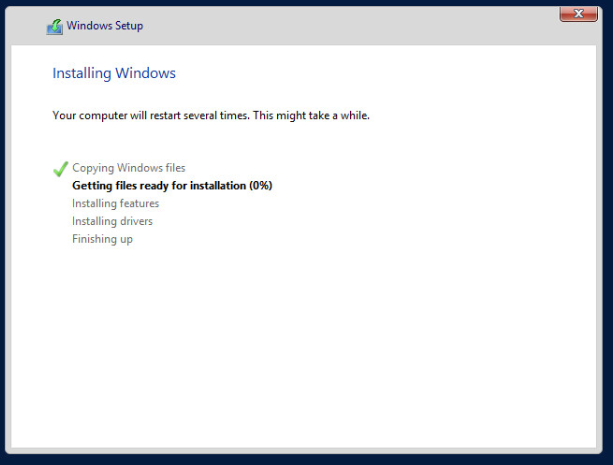
During this process, your client will restart. Make sure that the next time you boot into BIOS, you restore the boot options back to default.
When the installation process is done, you will be given the out of box experience. Go through it and set up your client to your preferences. Note that you can now use your mouse cursor!
Configuring the Blank Client
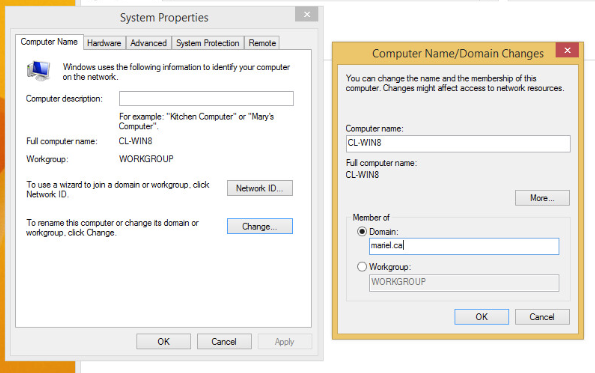
Add Client to Domain
In order to add this new client to our active directory domain, you will need to change the client's DNS server to your server's IP address, go to System Properties, change the domain, and enter your administrator credentials for your Windows server. See Assignment 1 for more detailed instructions.
You will need to restart the machine after doing this, and when it turns back on you can log into the administrator account of the mariel.ca domain.
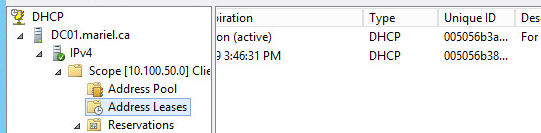
Creating a DHCP Reservation and DNS A Record
We want to create a DHCP reservation for this client. In order to do this, you will need to get the MAC address of your client. An easy way to do this is to open your DHCP Manager from Server Manager. Under the Scope which we created much earlier in this report, you will see CL-WIN8 under Address Leases.
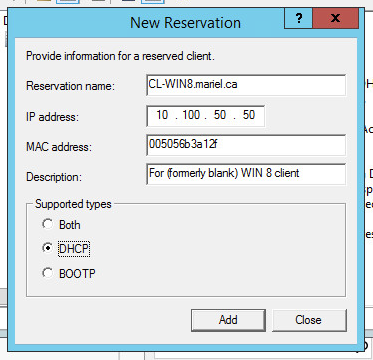
Now, right-click on "Reservations" and select "New Reservation…".

You will be prompted to enter your reservation information. Enter the fully qualified name of your client under Reservation Name, enter the IP address you want it to always have, type out the MAC address you copied down, and give it whatever description you want. Finally, select the supported types you want and click "Add".
Now that we have created the reservation, we need to release and get the IP address from the DHCP server. Open a command prompt on the client, and enter the following two commands:
ipconfig /releaseipconfig /renew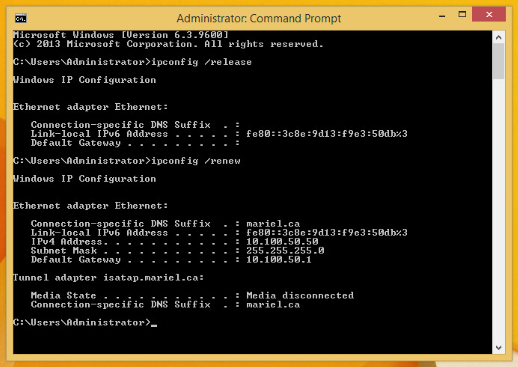
As you can see above, the DHCP server should give the IP address that the reservation assigned.
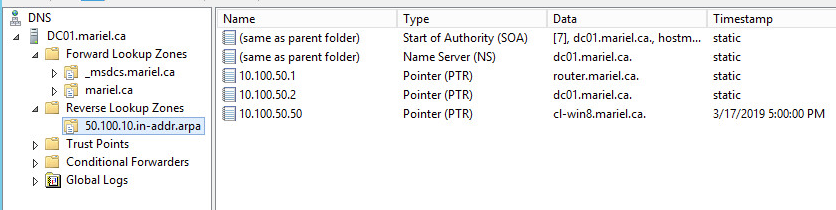
After that, open DNS Manager just to ensure that everything is working correctly. You should see the appropriate IP address next to CL-WIN8.

The reverse zone entry should also have been created, as below.
Once you've reached this point, your client is ready to go!
Conclusion
After following this report, you should have a good understanding of what Windows Deployment Services (WDS) is and how it works. You should have the practical knowledge to be able to install DNS, DHCP, and WDS to an Active Directory Domain Controller. And finally, you should be able to capture an OS image from another machine, and deploy that to a blank machine. All of this should have helped you refine your Windows administration skills. Thank you for following along.
References
- Windows Deployment Services on Windows Dev Center
- Remote Installation Service (RIS) on Tech Target by Margaret Rouse
- Windows Deployment Services on Wikipedia
- Description of Windows Deployment Services (WDS) by Utilize Windows
- Configuring Windows Deployment Services on IT Pro Today by Karim Budzar
- Benefits of Using Windows Deployment Services on Source Daddy
- How to get started with Windows Deployment Services by Jesus Vigo
- WDS Capture Image – winload.exe corrupt or missing by kconner, reply by John Masson
- How to CAPTURE Image and Deploy Image using WDS on IT Ingredients by Raakesh Kapoor
- Lecture material by Robert Pearce from SYST 23551 – Windows Administration, taken at Sheridan College (2019)